How to Create Black-and-White Photographs With Color Accents

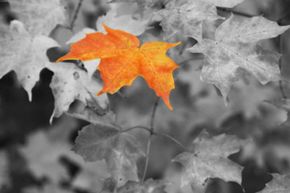
leaf photo
This image was produced via the selection process detailed on the next page. In the original photograph, this leaf would've been part of a crowd — here, it's singled out. See more Cool Camera Stuff Pictures.
Vstock

Think about how many times you've flipped through a magazine and seen it: a black-and-white image spread across the page, with a bold splash of color highlighting part of the scene. Maybe it's the blue eyes of a model, or the bright plumage of a bird as it wings across the page, but that simple break from the monochrome background draws your eye and captures your attention.

The use of color accents in a black-and-white photograph is an old technique — older, in fact, than color photography. (Originally, the color was painted onto photographic prints.) The trick goes in and out of vogue with advertisers, but peruse any magazine rack long enough and you're almost guaranteed to find at least one example. And although this special effect is most often found in professional photography, modern photo editing software puts it within easy reach of any interested amateur.

Advertisement

But in an era when color photography can capture the most subtle shades nature throws at us, why does black-and-white photography still hold such sway? Part of the answer has to do with how we're wired to process visual information. Color is a powerful force for driving our focus — the hunter-gatherer instincts that helped us spot animals hiding in the bush now draw us to pick out the color that doesn't seem to belong in a scene. Take away the color from even a familiar image, however, and our minds are thrown for a perceptual loop. We may impose remembered hues on an object seen in black-and-white, but we're also likely to become much more aware of the texture, patterns and shading in the image. These attributes would still be there in a color photo, but they take front-and-center in black-and-white.

Adding a selective splash of color to a black-and-white image leverages the most powerful features of both black-and-white and color photography. The color provides striking contrast that immediately draws your eye to the colorized subject — most often the main focal point of the photo. You instinctively scan the rest of the picture and pick up on the emphasized pattern and texture play against the color contrast, causing a truly enhanced viewing experience [sources: Morton; Ghodke].

For such a complex effect, it's an easy one to achieve with modern editing software. The specific process for the program you use may vary slightly, but the instructions on the next two pages will give you a big head start toward learning to add color accents to black-and-white photos.

Advertisement
Technique: Inverse Selection

Adding color accents to your black-and-white photos isn't hard to do, but, like any artistic technique, it's most effective when used judiciously. Study the color photo: Where do you want to direct the viewer's attention? Maybe the main subject has a colorful feature, such as a bright red bow in a model's hair. On the other hand, you might want to colorize a small background detail, pulling the viewer away from the subject and adding mystery — the viewer will wonder what's so important about the seemingly tiny detail. Sometimes, after all, the fun is in making your audience think and keeping them guessing.

Digital editing tools allow you to apply various filters and effects over your original image. After opening a color photo in your editor, apply a black-and-white filter to it. (You may find this option in the Filter, Enhance, or Adjustment menu — in Adobe Photoshop, go to Image > Adjustments > Desaturate.) The on-screen image will change to black-and-white, but the software will retain the color data. The black-and-white reduction you see would vanish if you undid the filter. Just don't convert the image to black and white — that will prompt the software to ditch the color data entirely.

Advertisement

But what if you placed the filter over only part of the photo?

Undo the filter, returning your photo to its original state. Then:

  • Use your editor's selection tools to select the spot you wish to highlight with color. With a little practice, you can highlight tiny, precise sections of the image.
  • Next, invert your selection (in Photoshop, go to Select > Inverse). This selects the rest of the photo, effectively masking your subject area from whatever changes you apply to the rest of your photo.
  • Finally, apply a black-and-white filter or effect. The mask will preserve the color in your subject area.
  • Save your edited photo under a new name (using Save As) so that you'll still have the original color photo.

The amount of color you reveal will depend on the image and your artistic goal. But the mechanics behind the effect are really that simple.

What if the color you want to bring out in your photo is located in tiny bits and splashes throughout the image?

Advertisement

Technique: Reductive Production

Because most colors are actually composed of shades from a few color groups, you may have to add additional colors back into the photo at minor saturations to get the hue you're looking for.
©iStockphoto.com/Thinkstock

If your subject of interest isn't a single object but rather a legion of bright color (say, a field of sunflowers or a flock of team jerseys), hand-selecting each piece might be more trouble than the final image is worth. If you want to highlight a single color or family of colors throughout a photo, a simple reductive production technique can achieve this striking effect.

  • First, open the color adjustment window in your editor. (In Photoshop, this is called Adjust Hue/Saturation.) This will allow you to select specific color ranges, such as blues, greens, yellows or reds, and then adjust their temperature, brightness and saturation. Saturation is the variable we're interested in here.
  • Select a color you don't want to highlight and drop its saturation to 0.
  • Repeat this for all but one of the color groups.
  • As always, make sure you save your edited image under a different name (using Save As) so that you'll still have the original color photo.

So what does this do to the photo? By pulling a particular color's saturation down to 0, you're omitting it from the image and creating grayscale. Whatever colors are left will be striking. You can play with the saturation levels of each color group to create the amount of grayscale — and the specific hues — you're interested in. Your final product will be a mostly black-and-white image with a few key objects painted in bold colors.

Advertisement

This technique will produce color highlights without the sharp contrast of the selective filtering technique from the previous page. However, adjusting a color's saturation will affect everything from that color group in the photo: If your bridal bouquet and the brick church walls are both shades of red, they'll both pop. You can select any unwanted color areas and apply a black-and-white filter to them.

Enjoy your new-found power as you practice these techniques, but never forget the fundamental rule of photo editing: The most striking effect in the world is pretty much worthless if you use it on a lousy photograph. Composition, balance, rhythm and good exposure should always come first. Use these fundamentals to make a striking image; your special effect will push a good image over the top to truly wow-worthy [source: Ghodke].

Advertisement

Black and White Photos FAQ

What are old black and white photos called?
It is called monochrome photography; a type of photography where an image position collects and shows light in varying amounts, without altering the hue.
What do black and white photos represent?
Some photographers use black and white to focus on the subject’s emotions. It can simply and strip away other details and distractions in the photo, allowing emotions to come through to the viewer.
Why do people do black and white portraits?
Black and white photography eliminates distractions and allows the viewer to focus on composition, shapes and patterns, textures and the subject’s emotion.
Do black and white photos look better?
Some people prefer them, while others like full color photos. It really is subjective to the photographer and client.
Can color photos be printed in black and white?
Yes, they can. The easiest method is to convert the color image to a black and white image using software on a computer. To do this you simply need to switch the color mode from RGB to Grayscale. The exact method will vary slightly depending on what software you use, but the option is often under Image > Adjustments.

Lots More Information

How to Create Black-and-White Photographs with Color Accents: Author's note

There's a saying that posits all writers really just want to be photographers, while all photographers want to pen bestselling novels. I'll admit to being in the former category; whenever I can take out my DSLR and snap a few photos as part of an assignment, I'm a happy, happy writer. Maybe it's the writer's frustration of trying to paint images with words, or the photographer's struggle to capture an entire story in a single moment; the two mediums seem to complement each other, telling richer stories together than either one can on its own.

While researching this piece, I stumbled across the Web site of the Harry Ransom Center at the University of Texas, which houses in its collection the first photograph ever taken. Joseph Nicéphore Niépce, a French gentleman of means, created the image in the spring of 1826. The blurry, grainy view from Niépce's villa window is hard to see in the Web site's gallery, but the ghostly image still made the hair on the back of my neck stand up. Who would have thought that a random sunny day in the French countryside would be captured, frozen on a dinged metal plate and preserved for generation after future generation to stare at in wonder. It's a visceral, immediate magic that differs from the slow, steady burn of powerful writing. The two are beautiful in their own rights, but each certainly plays to its own strengths.

Related Articles

  • Design-Lib. "Graphic Design Principles." 2012. (Feb. 12, 2012) http://www.design-lib.com/graphic-design-principles-gd.php
  • Ghodke, Prakash. "Creating Impact with Partial Colour." Photo Tuts+. Nov. 10, 2010. (Feb. 13, 2012) http://photo.tutsplus.com/articles/inspiration/creating-impact-with-partial-colour-60-stunning-photos/
  • Greenspun, Philip. "History of Photography Timeline." Photo.net. Jan. 2007. (Feb. 9, 2012) http://photo.net/history/timeline
  • Harry Ransom Center, The University of Texas at Austin. "The First Photograph." (Feb. 9, 2012) http://www.hrc.utexas.edu/exhibitions/permanent/wfp/
  • Morton, J.L. "Basic Color Theory." Color Matters.com. 2011. (Feb 13, 2012) http://www.colormatters.com/color-and-design/basic-color-theory

Advertisement

Loading...