How Cameras Work

A fully manual single-lens-reflex camera.

Photography is undoubtedly one of the most important inven­tions in history -- it has truly transformed how people conceive of the world. Now we can "see" all sorts of things that are actually many miles -- and years -- away from us. Photography lets us capture moments in time and preserve them for years to come.

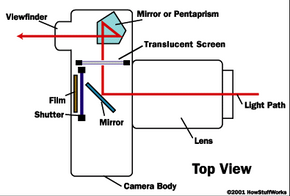
The basic technology that makes all of this possible is fairly simple. A still film camera is made of three basic elements: an optical element (the lens), a chemical element (the film) and a mechanical element (the camera body itself). As we'll see, the only trick to photography is calibrating and combining these elements in such a way that they record a crisp, recognizable image.

Advertisement

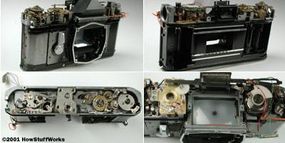
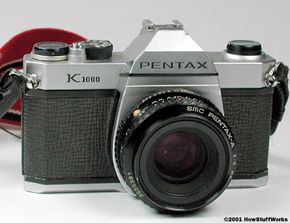
There are many different ways of bringing everything together. In this article, we'll look at a manual single-lens-reflex (SLR) camera. This is a camera where the photographer sees exactly the same image that is exposed to the film and can adjust everything by turning dials and clicking buttons. Since it doesn't need any electricity to take a picture, a manual SLR camera provides an excellent illustration of the fundamental processes of photography.

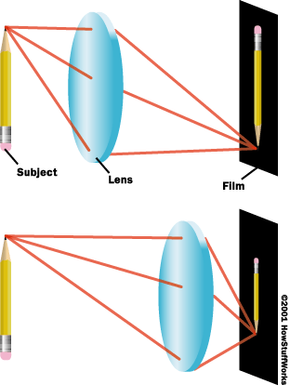
The optical component of the camera is the lens. At its simplest, a lens is just a curved piece of glass or plastic. Its job is to take the beams of light bouncing off of an object and redirect them so they come together to form a real image -- an image that looks just like the scene in front of the lens.

But how can a piece of glass do this? The process is actually very simple. As light travels from one medium to another, it changes speed. Light travels more quickly through air than it does through glass, so a lens slows it down.

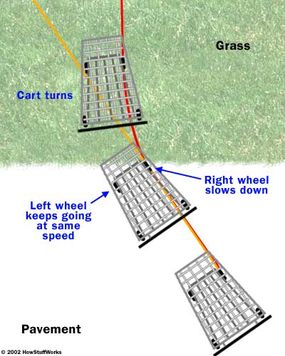
When light waves enter a piece of glass at an angle, one part of the wave will reach the glass before another and so will start slowing down first. This is something like pushing a shopping cart from pavement to grass, at an angle. The right wheel hits the grass first and so slows down while the left wheel is still on the pavement. Because the left wheel is briefly moving more quickly than the right wheel, the shopping cart turns to the right as it moves onto the grass.

The effect on light is the same -- as it enters the glass at an angle, it bends in one direction. It bends again when it exits the glass because parts of the light wave enter the air and speed up before other parts of the wave. In a standard converging, or convex lens, one or both sides of the glass curves out. This means rays of light passing through will bend toward the center of the lens on entry. In a double convex lens, such as a magnifying glass, the light will bend when it exits as well as when it enters.

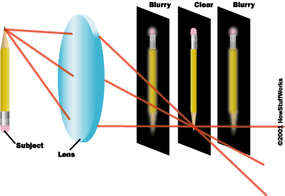
This effectively reverses the path of light from an object. A light source -- say a candle -- emits light in all directions. The rays of light all start at the same point -- the candle's flame -- and then are constantly diverging. A converging lens takes those rays and redirects them so they are all converging back to one point. At the point where the rays converge, you get a real image of the candle. In the next couple of sections, we'll look at some of the variables that determine how this real image is formed.­

Advertisement

Cameras: Focus

We've seen that a real image is formed by light moving through a convex lens. The nature of this real image varies depending on how the light travels through the lens. This light path depends on two major factors:

  • The angle of the light beam's entry into the lens
  • The structure of the lens

The angle of light entry changes when you move the object closer or farther away from the lens. You can see this in the diagram below. The light beams from the pencil point enter the lens at a sharper angle when the pencil is closer to the lens and a more obtuse angle when the pencil is farther away. But overall, the lens only bends the light b­eam to a certain total degree, no matter how it enters. Consequently, light beams that enter at a sharper angle will exit at a more obtuse angle, and vice versa. The total "bending angle" at any particular point on the lens remains constant.

Advertisement

As you can see, light beams from a closer point converge farther away from the lens than light beams from a point that's farther away. In other words, the real image of a closer object forms farther away from the lens than the real image from a more distant object.

You can observe this phenomenon with a simple experiment. Light a candle in the dark, and hold a magnifying glass between it and the wall. You will see an upside down image of the candle on the wall. If the real image of the candle does not fall directly on the wall, it will appear somewhat blurry. The light beams from a particular point don't quite converge at this point. To focus the image, move the magnifying glass closer or farther away from the candle.

This is what you're doing when you turn the lens of a camera to focus it -- you're moving it closer or farther away from the film surface. As you move the lens, you can line up the focused real image of an object so it falls directly on the film surface.

You now know that at any one point, a lens bends light beams to a certain total degree, no matter the light beam's angle of entry. This total "bending angle" is determined by the structure of the lens.

Advertisement

Camera Lenses

A standard 50 mm lens doesn't significantly shrink or magnify the image.

In the last section, we saw that at any one point, a lens bends light beams to a certain total degree, no matter the light beam's angle of entry. This total "bending angle" is determined by the structure of the lens.

A lens with a rounder shape (a center that extends out farther) will have a more acute bending angle. Basically, curving the lens out increases the distance between different points on the lens. This increases the amount of time that one part of the light wave is moving faster than another part, so the light makes a sharper turn.

Advertisement

Increasing the bending angle has an obvious effect. Light beams from a particular point will converge at a point closer to the lens. In a lens with a flatter shape, light beams will not turn as sharply. Consequently, the light beams will converge farther away from the lens. To put it another way, the focused real image forms farther away from the lens when the lens has a flatter surface.

Increasing the distance between the lens and the real image actually increases the total size of the real image. If you think about it, this makes perfect sense. Think of a projector: As you move the projector farther away from the screen, the image becomes larger. To put it simply, the light beams keep spreading apart as they travel toward the screen.

The same basic thing happens in a camera. As the distance between the lens and the real image increases, the light beams spread out more, forming a larger real image. But the size of the film stays constant. When you attach a very flat lens, it projects a large real image but the film is only exposed to the middle part of it. Basically, the lens zeroes in on the middle of the frame, magnifying a small section of the scene in front of you. A rounder lens produces a smaller real image, so the film surface sees a much wider area of the scene (at reduced magnification).

Professional cameras let you attach different lenses so you can see the scene at various magnifications. The magnification power of a lens is described by its focal length. In cameras, the focal length is defined as the distance between the lens and the real image of an object in the far distance (the moon for example). A higher focal length number indicates a greater image magnification.

Different lenses are suited to different situations. If you're taking a picture of a mountain range, you might want to use a telephoto lens, a lens with an especially long focal length. This lens lets you zero in on specific elements in the distance, so you can create tighter compositions. If you're taking a close-up portrait, you might use a wide-angle lens. This lens has a much shorter focal length, so it shrinks the scene in front of you. The entire face is exposed to the film even if the subject is only a foot away from the camera. A standard 50 mm camera lens doesn't significantly magnify or shrink the image, making it ideal for shooting objects that aren't especially close or far away.

Advertisement

Cameras: Recording Light

The chemical component in a traditional camera is film. Essentially, when you expose film to a real image, it makes a chemical record of the pattern of light.

It does this with a collection of tiny light-sensitive grains, spread out in a chemical suspension on a strip of plastic. When exposed to light, the grains undergo a chemical reaction.

Advertisement

Once the roll is finished, the film is developed -- it is exposed to other chemicals, which react with the light-sensitive grains. In black and white film, the developer chemicals darken the grains that were exposed to light. This produces a negative, where lighter areas appear darker and darker areas appear lighter, which is then converted into a positive image in printing.

Color film has three different layers of light-sensitive materials, which respond, in turn, to red, green and blue. When the film is developed, these layers are exposed to chemicals that dye the layers of film. When you overlay the color information from all three layers, you get a full-color negative.

For an in-depth description of this entire process, check out How Photographic Film Works.

So far, we've looked at the basic idea of photography -- you create a real image with a converging lens, and you record the light pattern of this real image on a layer of light-sensitive material. Conceptually, this is all that's involved in taking a picture. But to capture a clear image, you have to carefully control how everything comes together.

Obviously, if you were to lay a piece of film on the ground and focus a real image onto it with a converging lens, you wouldn't get any kind of usable picture. Out in the open, every grain in the film would be completely exposed to light. And without any contrasting unexposed areas, there's no picture.

To capture an image, you have to keep the film in complete darkness until it's time to take the picture. Then, when you want to record an image, you let some light in. At its most basic level, this is all the body of a camera is -- a sealed box with a shutter that opens and closes between the lens and film. In fact, the term camera is shortened from camera obscura, literally "dark room" in Latin.

For the picture to come out right, you have to precisely control how much light hits the film. If you let too much light in, too many grains will react, and the picture will appear washed out. If you don't let enough light hit the film, too few grains will react, and the picture will be too dark. In the next section, we'll look at the different camera mechanisms that let you adjust the exposure.

Advertisement

Cameras: The Right Light

The plates in the iris diaphragm fold in on each other to shrink the aperture and expand out to make it wider.

In the last section, we saw that you need to carefully control the film's exposure to light, or your picture will come out too dark or too bright. So how do you adjust this exposure level? You have to consider two major factors:

  • How much light is passing through the lens
  • How long the film is exposed

To increase or decrease the amount of light passing through the lens, you have to change the size of the aperture -- the lens opening. This is the job of the iris diaphragm, a series of overlapping metal plates that can fold in on each other or expand out. Essentially, this mechanism works the same way as the iris in your eye -- it opens or closes in a circle, to shrink or expand the diameter of the lens. When the lens is smaller, it captures less light, and when it is larger, it captures more light.

Advertisement

The length of exposure is determined by the shutter speed. Most SLR cameras use a focal plane shutter. This mechanism is very simple -- it basically consists of two "curtains" between the lens and the film. Before you take a picture, the first curtain is closed, so the film won't be exposed to light. When you take the picture, this curtain slides open. After a certain amount of time, the second curtain slides in from the other side, to stop the exposure.

When you click the camera's shutter release, the first curtain slides open, exposing the film. After a certain amount of time, the second shutter slides closed, ending the exposure. The time delay is controlled by the camera's shutter speed knob.

This simple action is controlled by a complex mass of gears, switches and springs, like you might find inside a watch. When you hit the shutter button, it releases a lever, which sets several gears in motion. You can tighten or loosen some of the springs by turning the shutter speed knob. This adjusts the gear mechanism, increasing or decreasing the delay between the first curtain opening and the second curtain closing. When you set the knob to a very slow shutter speed, the shutter is open for a very long time. When you set the knob to a very high speed, the second curtain follows directly behind the first curtain, so only a tiny slit of the film frame is exposed at any one time.

The ideal exposure depends on the size of the light-sensitive grains in the film. A larger grain is more likely to absorb light photons than a smaller grain. The size of the grains is indicated by a film's speed, which is printed on the canister. Different film speeds are suited to different types of photography -- 100 ISO film, for example, is optimal for shots in bright sunlight, while 1600 film should only be used in relatively low light.

Inside a manual SLR camera, you'll find an intricate puzzle of gears and springs. Click on each picture for a high-resolution close-up shot.

As you can see, there's a lot involved in getting the exposure right -- you have to balance film speed, aperture size and shutter speed to fit the light level in your shot. Manual SLR cameras have a built-in light meter to help you do this. The main component of the light meter is a panel of semi-conductor light sensors that are sensitive to light energy. These sensors express this light energy as electrical energy, which the light meter system interprets based on the film and shutter speed.

Now, let's see how an SLR camera body directs the real image to the viewfinder before you take the shot, and then directs it to the film when you press the shutter button.

Advertisement

SLR Cameras vs. Point-and-Shoot

There are two types of consumer film cameras on the market -- SLR cameras and "point-and-shoot" cameras. The main difference is how the photographer sees the scene. In a point-and-shoot camera, the viewfinder is a simple window through the body of the camera. You don't see the real image formed by the camera lens, but you get a rough idea of what is in view.

In an SLR camera, you see the actual real image that the film will see. If you take the lens off of an SLR camera and look inside, you'll see how this works. The camera has a slanted mirror positioned between the shutter and the lens, with a piece of translucent glass and a prism positioned above it. This configuration works like a periscope -- the real image bounces off the lower mirror on to the translucent glass, which serves as a projection screen. The prism's job is to flip the image on the screen, so it appears right side up again, and redirect it on to the viewfinder window.

Advertisement

When you click the shutter button, the camera quickly switches the mirror out of the way, so the image is directed at the exposed film. The mirror is connected to the shutter timer system, so it stays open as long as the shutter is open. This is why the viewfinder is suddenly blacked out when you take a picture.

The mirror in an SLR camera directs the real image to the viewfinder. When you hit the shutter button, the mirror flips up so the real image is projected onto the film.

In this sort of camera, the mirror and the translucent screen are set up so they present the real image exactly as it will appear on the film. The advantage of this design is that you can adjust the focus and compose the scene so you get exactly the picture you want. For this reason, professional photographers typically use SLR cameras.

These days, most SLR cameras are built with both manual and automatic controls, and most point-and-shoot cameras are fully automatic. Conceptually, automatic cameras are pretty much the same as fully manual models, but everything is controlled by a central microprocessor instead of the user. The central microprocessor receives information from the autofocus system and the light meter. Then it activates several small motors, which adjust the lens and open and close the aperture. In modern cameras, this a pretty advanced computer system.

Automatic point-and-shoot camera use circuit boards and electric motors, instead of gears and springs.

In the next section, we'll look at the other end of the spectrum -- a camera design with no complex machinery, no lens and barely any moving parts.

Advertisement

Homemade Cameras

As we've seen in this article, even the most basic, completely manual SLR is a complex, intricate machine. But cameras are not inherently complex -- in fact, the basic elements are so simple you can make one yourself with only a few inexpensive supplies.

The simplest sort of homemade camera doesn't use a lens to create a real image -- it gathers light with a tiny hole. These pinhole cameras are easy to make and a lot of fun to use -- the only hard part is that you have to develop the film yourself.

Advertisement

A pinhole camera is simply a box with a tiny hole in one side and some film or photographic paper on the opposite size. If the box is otherwise "light-tight," the light coming through the pinhole will form a real image on the film. The scientific principle behind this is very simple.

If you were to shine a flashlight in a dark room, through a tiny hole in a wide piece of cardboard, the light would form a dot on the opposite wall. If you moved the flashlight, the light dot would also move -- light beams from the flashlight move through the hole in a straight line.

In a larger visual scene, every particular visible point acts like this flashlight. Light reflects off each point of an object and travels out in all directions. A small pinhole lets in a narrow beam from each point in a scene. The beams travel in a straight line, so light beams from the bottom of the scene hit the top of the piece of film, and vice-versa. In this way, an upside down image of the scene forms on the opposite side of the box. Since the hole is so small, you need a fairly long exposure time to let enough light in.

There are a number of ways to build this sort of camera -- some enthusiasts have even used old refrigerators and cars as light-tight boxes. One of the most popular designs uses an ordinary cylinder oatmeal box, coffee can, or similar container. Its easiest to use a cardboard container with a removable plastic lid.

You can build this camera in a few simple steps:

  1. The first thing to do is paint the lid black, inside and out. This helps light-proof the box. Be sure to use flat black paint, rather than glossy paint that will reflect more light.
  2. Cut a small hole (about the size of a matchbox) in the center of the canister bottom (the nonremovable side).
  3. Cut out a piece of heavy-duty aluminum foil, or heavy black paper, about twice the size of the hole in the bottom of the canister.
  4. Take a No. 10 sewing needle and carefully make a hole in the center of the foil. You should only insert the needle halfway, or the hole will be too big. For best results, position the foil between two index cards and rotate the needle as you push it through.
  5. Tape the foil over the hole in the bottom of the canister, so the pinhole is centered. Attach the foil securely, with black tape, so light only shines through the pinhole.
  6. All you need for the shutter is a piece of heavy black paper large enough to cover most of the cannister bottom. Tape one side of the paper securely to the side of the cannister bottom, so it makes a flap over the pinhole in the middle. Tape the other side of the flap closed on the other side of the pinhole. Keep the flap closed until you are ready to take a picture.
  7. To load the camera, attach any sort of film or photographic paper to the inside of the canister lid. Of course, for the film to work, you must load it and develop it in complete darkness. With this camera design, you won't be able to simply drop the film off at the drug store -- you'll have to develop it yourself or get someone to help you.

Choosing a good camera design, film type and exposure time is largely a matter of trial and error. But, as any pinhole enthusiast will tell you, this experimentation is the most interesting thing about making your own camera. To find out more about pinhole photography and see some great camera designs, check out some of the sites listed on the next page.

­ Throughout the history of photography, there have been hundreds of different camera systems. But amazingly, all these designs -- from the simplest homemade box camera to the newest digital camera -- combine the same basic elements: a lens system to create the real image, a light-sensitive sensor to record the real image, and a mechanical system to control how the real image is exposed to the sensor. And when you get down to it, that's all there is to photography!

For more information on cameras, light, film and related topics, check out the links below.

Advertisement

Camera FAQ

Can I download a camera for my computer?
If a computer has a camera built in, it normally has the program needed to run it already installed. You can download free software, such as Windows Camera, if you need a program. However, if you do not have a camera in your computer, you'll need to purchase an external webcam.
How do I access Google Camera?
Google Camera comes standard on all Google smartphones. You should be able to access it by finding the app on your phone and clicking it.
What camera is best for photography?
The best camera for photography is very subjective. However, the Sony a6100, Canon EOS Rebel T8i, and Nikon D3500 are all excellent digital cameras suitable for budding and intermediate photographers.
Is Open Camera free?
Open Camera, an Android app, is completely free to download and use.
How much does a webcam cost?
You can get a good webcam for less than $100, with the majority of options hovering around $70. The best budget option is the Aukey PC-LM1 Full HD Webcam, which is normally between $40-60 depending on the retailer and if it's on sale at the time.

Advertisement

Loading...