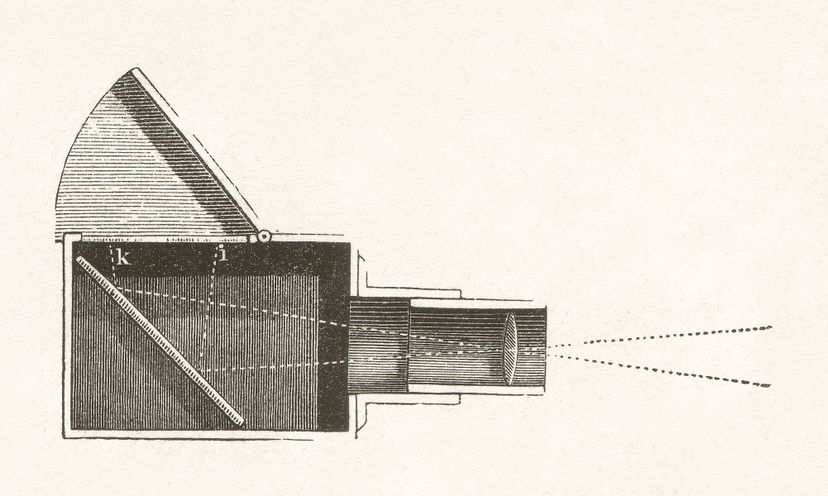
This wood engraving of a portable camera obscura, aka pinhole camera, was published in 1877. ZU_09 / Getty Images
A pinhole camera, or a camera obscura device, is the simplest camera possible. It consists of a light-proof box, some sort of film and a pinhole. The pinhole is an extremely small hole like you would make with the tip of a pin in a piece of thick aluminum foil. Light enters through the pinhole, creating an upside-down image on the opposite side, allowing for basic photography without the need for a lens.
A pinhole camera works on a simple principle: Imagine you are inside a large, dark, room-sized box containing a pinhole. Outside that dark chamber is a friend with a flashlight, and he is shining the flashlight at different angles through the pinhole. When you look at the wall opposite the pinhole, what you will see is a small dot created by the flashlight's beam shining through the pinhole. The small dot will move as your friend moves his flashlight. The smaller the pinhole (within limits), the smaller and sharper the point of light that the flashlight creates.
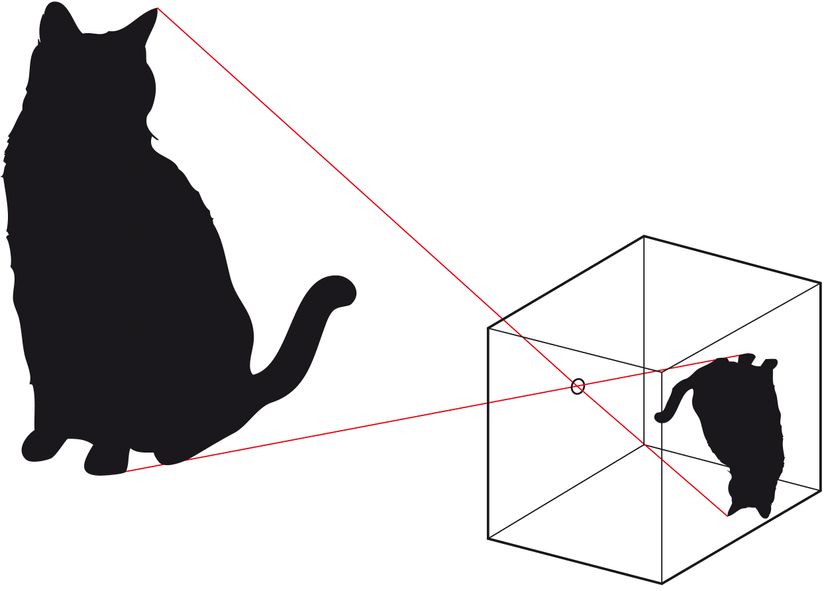
Now if you take your large, dark, pinhole-equipped room outside and you point it at a nice landscape, what you will see when you look at the opposite wall from the pinhole is an inverted and reversed projected image of the scene outside. Each point in the scene emits light, and, just like the flashlight, the beam of light from that point passes through the pinhole and creates a point of light on the back wall. All of the points in the scene do that at the same time, so an entire image, in focus, appears on the back wall of the room. The image is very dim because the pinhole is so small, but you can see it if the room is very dark. Some camera obscuras use an angled mirror to produce an upright projected image.
Advertisement
This diagram demonstrates how a or camera obscura projects images when an angled mirror isn't part of the setup.
A pinhole camera is a very similar setup. A smaller version of that room, the film inside the photographic camera replaces you. The film records the image that comes in through the pinhole. The portable camera obscura records a nice, in-focus image of the scene at which you point the camera. Usually, you have to expose the film for a long time because the pinhole lets so little light through.
The pinhole in a pinhole camera acts as the lens. The pinhole forces every point emitting light in the scene to form a small point on the film, so the image is crisp. The reason a normal camera uses a lens rather than a pinhole is because the lens creates a much larger hole through which light can make it onto the film, meaning the film can be exposed faster. However, a pinhole camera can use a convex lens to enhance the quality and sharpness of the projected image. The convex lens helps focus the incoming light rays, resulting in a clearer and more detailed image.
Advertisement
Brief History of Camera Obscura
Camera obscura, which is Latin for "dark room," is an optical phenomenon and a precursor to the modern camera. It has captivated artists, scientists and curious minds for centuries. For example, Chinese philosopher Mozi described the projection of an image through a small opening as early as the 5th century BCE. Ancient Greek philosopher Aristotle studied the behavior of light and its ability to form inverted images, and by the 11th century, scholar Alhazen (Ibn al-Haytham) described the workings of camera obscura and its applications in astronomy and perception in his Book of Optics.
Leonardo da Vinci’s studies of camera obscura in his Codex Atlanticus influenced the development of the concept as an artistic device in the 15th century. While a source of debate, Dutch painter Johannes Vermeer is one artist who art historians believe might have used camera obscura as a drawing aid because of his accurate use of perspective. Regardless of whether he did or not, camera obscura did help artists. Venetian nobleman Daniele Barbaro stated,” There on the paper, you will see the whole view as it really is, with its distances, its colors and shadows and motion, the clouds, the water twinkling, the birds flying. By holding the paper steady, you can trace the whole perspective with a pen.”
Advertisement
And of course, as the pinhole camera demonstrates, camera obscura played a major role in the development of photography. Joseph Nicéphore Niépce, one of the pioneers of photography, performed historical camera obscura experiments, which resulted in “View from the Window at Le Gras,” credited as the first published picture.
How to Build a Camera Obscura
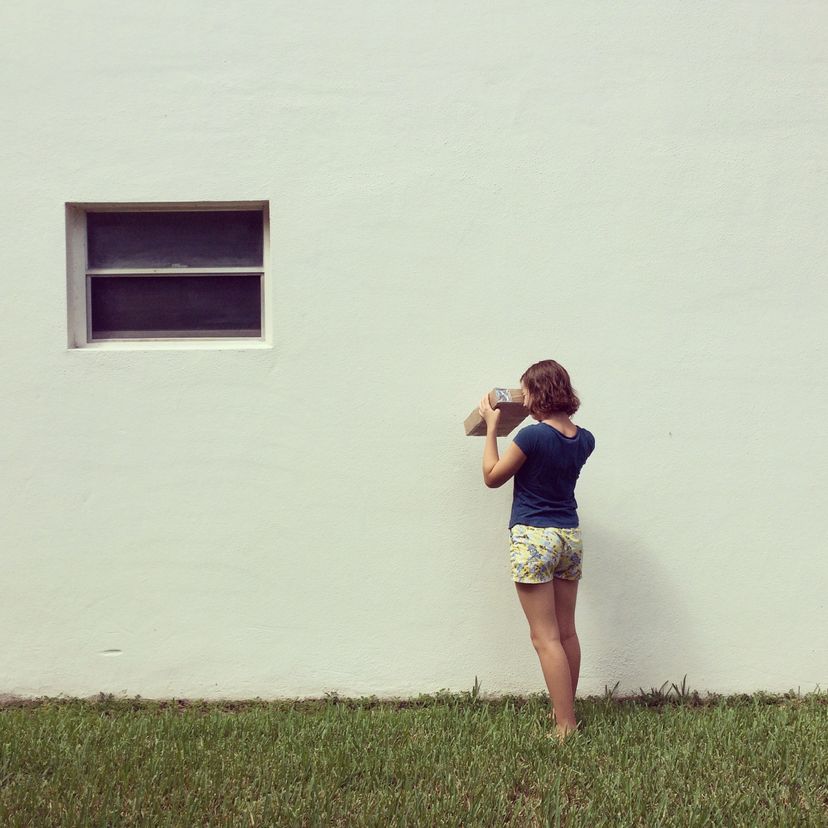
A young girl looks in a homemade cardboard pinhole camera. Cyndi Monaghan / Getty Images
You can build camera obscura devices with just a few materials. In a few simple steps, you can project images from your home.
1. Gather your materials.
You will need:
Advertisement
a cardboard box or a dark room with covered windows
black duct tape or aluminum foil
a small piece of cardboard or thick paper
a craft knife or scissors
tracing paper or a thin, very white sheet
tape or glue
You can optionally add a lens or a magnifying glass for enhanced image quality.
2. Choose a suitable location.
Find a room or space with minimal light. If using a cardboard box, make sure it is large enough for you to fit inside comfortably.
3. Prepare the box or dark room.
Cover any windows or openings with black duct tape or aluminum foil to block out rays of light. Ensure the space is completely dark after you close the door.
4. Create an aperture.
Cut a small hole (around 1 to 2 centimeters in size) on one side of the box or the window covering. This will serve as the aperture through which light will enter.
5. Construct a translucent screen.
Cut a piece of cardboard or thick paper to fit the inside of the box or the wall opposite the aperture. Attach tracing paper or thin fabric to this surface using tape or glue. This viewing screen will project the image.
6. Position the camera obscura.
Place the box or position yourself in the darkened room in such a way that the aperture is facing a directly lighted focal point, either a scene or object outside. The light passing through the small hole will result in an inverted image projected onto the viewing screen.
7. Experiment and refine.
Adjust the distance between the aperture and the viewing screen to achieve a clear and focused image. You can also try adding a lens or a magnifying glass in front of the aperture to enhance the image quality of your camera obscura box.
This article was updated in conjunction with AI technology, then fact-checked and edited by a HowStuffWorks editor.
Advertisement
Pinhole Camera FAQs
What is a pinhole camera?
A pinhole camera is the simplest camera possible. It consists of a light-proof box, some sort of film and a pinhole. When light goes through the pinhole, it creates an inverted image at the back of the box.
What is the purpose of using a pinhole camera?
A pinhole camera is a simple camera used by photographers. Apart from artistic reasons, it is also used in solargraphy to observe the sun’s movement in the sky and in viewing eclipses.
What is the pinhole effect?
The concept of creating a pinhole is to block out the undesired rays when light passes through it. This creates a clear image of the object being viewed.
What is another name for a pinhole camera?
Pinhole cameras are also called camera obscura.
What is the main disadvantage of a pinhole camera?
The main disadvantage is it is extremely slow and requires a very high f/number and long exposures. That means you have to hold the camera very still.