How Photographic Film Works

photographic film
This is a cool spiral roll of 35mm camera film. Sean Gladwell / Getty Images

People have been using camera and film for more than ­100 years, both for still phot­ography and movies. There is something magical about the process -- humans are visual creatures, and a picture really does paint a thousand words for us!

Despite its long history, film remains the best way to capture still and moving pictures because of its incredible ability to record detail in a very stable form. In this article, you'll learn all about how film works, both inside your camera and when it is developed, so you can understand exactly what is going on!

Advertisement

The Basics

­­What does it really mean when you "take" a picture with a camera? When you click the shutter, you have frozen a moment in time by recording the visible light reflected from the objects in the camera's field of view. In order to do that, the reflected light causes a chemical change to the photographic film inside the camera. The chemical record is very stable, and can be subsequently developed, amplified and modified to produce a representation (a print) of that moment that you can put in your photo album or your wallet, or that can be reproduced millions of times in magazines, books and newspapers. You can even scan the photograph and put it on a Web site.

To understand the whole process, you'll learn some of the science behind photography -- exposing the image, processing the image, and producing a print of the image. It all starts with an understanding of the portion of the electromagnetic spectrum that human eyes are sensitive to: light.

Advertisement

Light and Energy

­Energy from the sun comes to the Earth in visible and invisible portions of the electromagnetic spectrum. Human eyes are sensitive to a small portion of that spectrum that includes the visible colors -- from the longest visible wavelengths of light (red) to the shortest wavelengths (blue).

Microwaves, radio waves, infrared, and ultraviolet waves are portions of the invisible electromagnetic spectrum. We cannot see these portions of the spectrum with our eyes, but we have invented devices (radios, infrared detectors, ultraviolet dyes, etc.) that let us detect these portions as well.

Advertisement

Light is neither a wave nor a particle, but has properties of both. Light can be focused like a wave, but its energy is distributed in discrete packets called photons. The energy of each photon is inversely related to the wavelength of the light -- blue light is the most energetic, while red light has the least energy per photon of exposure. Ultraviolet light (UV) is more energetic, but invisible to human eyes. Infrared light is also invisible, but if it is strong enough our skin detects it as heat.

It is the energy in each photon of light that causes a chemical change to the photographic detectors that are coated on the film. The process whereby electromagnetic energy causes chemical changes to matter is known as photochemistry. By carefully engineering materials, they can be chemically stable until they are exposed to radiation (light). Photochemistry comes in many different forms. For example, specially formulated plastics can be hardened (cured) by exposure to ultraviolet light, but exposure to visible light has no effect. When you get a sun tan, a photochemical reaction has caused the pigments in your skin to darken. Ultraviolet rays are particularly harmful to your skin because they are so energetic.

Inside a Roll of Film

­If you were to open a 35-mm cartridge of color print film, you would find a long strip of plastic that has coatings on each side. The heart of the film is called the base, and it starts as a transparent plastic material (celluloid) that is 4 thousandths to 7 thousandths of an inch (0.025 mm) thick. The back side of the film (usually shiny) has various coatings that are important to the physical handling of the film in manufacture and in processing.

It is the other side of the film that we are most interested in, because this is where the photochemistry happens. There may be 20 or more individual layers coated here that are collectively less than one thousandth of an inch thick. The majority of this thickness is taken up by a very special binder that holds the imaging components together. It is a marvelous, and ubiquitous material called gelatin. A specially purified version of edible gelatin is used for photography -- yes, the same thing that makes Jell-O jiggly holds film together, and has done so for more than 100 years! Gelatin comes from animal hides and bones. Thus, there is an important link between a cow, a hamburger and a roll of film that you might not have appreciated.

Advertisement

Some of the layers coated on the transparent film do not form images. They are there to filter light, or to control the chemical reactions in the processing steps. The imaging layers contain sub-micron sized grains of silver-halide crystals that act as the photon detectors. These crystals are the heart of photographic film. They undergo a photochemical reaction when they are exposed to various forms of electromagnetic radiation -- light. In addition to visible light, the silver-halide grains can be sensitized to infrared radiation.

Silver-halide grains are manufactured by combining silver-nitrate and halide salts (chloride, bromide and iodide) in complex ways that result in a range of crystal sizes, shapes and compositions. These primitive grains are then chemically modified on their surface to increase their light sensitivity.

The unmodified grains are only sensitive to the blue portion of the spectrum, and they are not very useful in camera film. Organic molecules known as spectral sensitizers are added to the surface of the grains to make them more sensitive to blue, green and red light. These molecules must adsorb (attach) to the grain surface and transfer the energy from a red, green, or blue photon to the silver-halide crystal as a photo-electron. Other chemicals are added internally to the grain during its growth process, or on the surface of the grain. These chemicals affect the light sensitivity of the grain, also known as its photographic speed (ISO or ASA rating).

Film Options

­When you purchase a roll of film for your camera, you have a lot of choices. T­hose products that have the word "color" in their name are generally used to produce color prints that you can hold in your hand and view by reflected light. The negatives that are returned with your prints are the exposures that were made in your camera. Those products that have the word "chrome" in their name produce a color transparency (slides) that requires some form of projector for viewing. In this case, the returned slides are the actual film that was exposed in your camera.

Once you decide on prints or slides, the next major decision is the film speed. Generally, the relative speed rating of the film is part of its name (MYColor Film 200, for example). ISO and ASA speed ratings are also generally printed somewhere on the box. The higher the number, the "faster" the film. "Faster" means increased light sensitivity. You want a faster film when you're photographing quickly moving objects and you want them to be in focus, or when you want to take a picture in dimly lit surroundings without the benefit of additional illumination (such as a flash).

Advertisement

When you make film faster, the trade-off is that the increased light sensitivity comes from the use of larger silver-halide grains. These larger grains can result in a blotchy or "grainy" appearance to the picture, especially if you plan to make enlargements from a 35-mm negative. Professional photographers may use a larger-format negative to reduce the degree of enlargement and the appearance of grain in their prints. The trade-off between photographic speed and graininess is an inherent part of conventional photography. Photographic-film manufacturers are constantly making improvements that result in faster films with less grain.

A slow-speed film is desirable for portrait photography, where you can control the lighting of the subject, the subject is stationary, and you are likely to want a large print from the negative. The finer silver-halide grains in such film produce the best results.

The advanced amateur photographer might encounter additional film designations such as tungsten balanced or daylight balanced. A tungsten-balanced film is meant to be used indoors where the primary source of light is from tungsten filament light bulbs. Since the visible illumination coming from a light bulb is different than from the sun (daylight), the spectral sensitivity of the film must be modified to produce a pleasing picture. This is most important when using a transparency film.

Taking a Picture: Film Speed

­T­he first step after loading the film is to focus the image on the surface of film. This is done by adjusting glass or plastic lenses that bend the reflected light from the objects onto the film. Older cameras required manual adjustment, but today's modern cameras use solid-state detectors to automatically focus the image, or else they are fixed-focus (no adjustment possible).

Next, the proper exposure must be set. The film speed is the first factor, and most of today's cameras automatically sense which speed film is being used from the markings that are on the outside of a 35-mm cartridge. The next two factors are interdependent, since the exposure to the film is the product of light intensity and exposure time. The light intensity is determined by how much reflected light is reaching the film plane. You used to have to carry a light meter to set the camera exposure, but most of today's cameras have built-in exposure meters. In addition to the brightness of the scene, the larger the diameter of the camera lens, the more light will be gathered. Obviously, the trade-off here is the cost of the camera and the resulting size and weight. If there is too much light reaching the film plane for the exposure-time setting, the lens can be "stepped down" (reduced in diameter) using the f-stop adjustment. This is just like the iris in your eye reacting to bright sunlight.

Advertisement

Photographic film has a limited exposure latitude. If it is underexposed, it will not detect all the reflected light from a scene. The resulting print appears to be muddy black and lacks detail. If it is over-exposed, all of the silver-halide grains are exposed so there is no discrimination between lighter and darker portions of the scene. The print appears to be washed out, with little color intensity.

There is an advantage to having a faster film in your camera. It allows you to have a smaller aperture setting for the same exposure time. This smaller aperture diameter produces a larger depth of field. Depth of field determines how much of the subject matter in your print is in focus. Sometimes, you may want to have a limited depth of field, so only the primary object is in focus and the background is out of focus.

Taking a Picture: Exposure Chemistry

­So, either manually or automatically, you now have an image that is focused on the film surface, and the proper exposure has been set through a combination of film speed, aperture settings (f-stop) and exposure time (usually fractions of a second, from one thirtieth to one one-thousandth of a second). Say cheese and push the button. What happened? While outwardly unexciting, the moment of exposure is when a lot of photochemistry happens.

By opening the camera's shutter for a fraction of a second, you formed a latent image of the visible energy reflected off the objects in your viewfinder. The brightest portion of your picture exposed the majority of the silver-halide grains in that particular part of the film. In other parts of the image, less light energy reached the film, and fewer grains were exposed.

Advertisement

When a photon of light is absorbed by the spectral sensitizer sitting on the surface of a silver-halide grain, the energy of an electron is raised into the conduction band from the valence band, where it can be transferred to the conduction band of the silver-halide-grain electronic structure. A conduction-band electron can then go on to combine with a positive hole in the silver-halide lattice and form a single atom of silver. This single atom of silver is unstable. However, if enough photoelectrons are present at the same time in the crystal lattice, they may combine with enough positive holes to form a stable latent-image site. It is generally felt that a stable latent-image site is at least two to four silver atoms per grain. A silver-halide grain contains billions of silver-halide molecules, and it only takes two to four atoms of uncombined silver to form the latent-image site.

In color film, this process happens separately for exposure to the red, green and blue portions of the reflected light. There is a separate layer in the film for each color: Red light forms a latent image in the red-sensitive layer of the film; green light forms a latent image in the green-sensitive layer; blue light forms a latent image in the blue-sensitive layer. The image is called "latent" because you can't detect its presence until the film is processed. The true photoefficiency of a film is measured by its performance as a photon detector. Any photon that reaches the film but does not form a latent image is lost information. Modern color films generally take from 20 to 60 photons per grain to produce a developable latent image.

Developing Film: Black & White

­When you deliver a roll of exposed film to the photo processor, it contains the latent images of the exposures that you made. These latent images must be amplified and stabilized in order to make a color negative that can then be printed and viewed by reflected light.

Before we cover the development of a color negative film, it might be best to step back and process a black-and-white negative. If you used black-and-white film in your camera, the same latent-image formation process would have occurred, except the silver-halide grains would have been sensitized to all wavelengths of visible light rather than to just red, green or blue light. In black-and-white film, the silver-halide grains are coated in just one or two layers, so the development process is easier to understand. Here is what happens:

Advertisement

  1. In the first step of processing, the film is placed in developing agent that is actually a reducing agent. Given the chance, the reducing agent will convert all the silver ions into silver metal. Those grains that have latent-image sites will develop more rapidly. With the proper control of temperature, time and agitation, grains with latent images will become pure silver. The unexposed grains will remain as silver-halide crystals.
  2. The next step is to complete the developing process by rinsing the film with water, or by using a "stop" bath that arrests the development process.
  3. The unexposed silver-halide crystals are removed in what is called the fixing bath. The fixer dissolves only silver-halide crystals, leaving the silver metal behind.
  4. In the final step, the film is washed with water to remove all the processing chemicals. The film strip is dried, and the individual exposures are cut into negatives.

When you are finished, you have a negative image of the original scene. It is a negative in the sense that it is darkest (has the highest density of opaque silver atoms) in the area that received the most light exposure. In places that received no light, the negative has no silver atoms and is clear. In order to make it a positive image that looks normal to the human eye, it must be printed onto another light-sensitive material (usually photographic paper).

In this development process, the magic binder gelatin played an important part. It swelled to allow the processing chemicals to get to the silver-halide grains, but kept the grains in place. This swelling process is vital for the movement of chemicals and reaction products through the layers of a photographic film. So far, no one has found a suitable substitute for gelatin in photographic products.

Developing Film: Color

This figure shows a magnified cross-section of a color negative film exposed to yellow light and then processed. In the additive system, yellow is red plus green. On the film, therefore, the red-sensitive and green-sensitive layers have formed cyan and magenta dyes, respectively.

­If your film were a color negative type (that gives you a print when returned from the photo processor), the processing chemistry is different in several major ways.

The development step uses reducing chemicals, and the exposed silver-halide grains develop to pure silver. Oxidized developer is produced in this reaction, and the oxidized developer reacts with chemicals called couplers in each of the image-forming layers. This reaction causes the couplers to form a color, and this color varies depending on how the silver-halide grains were spectrally sensitized. A different color-forming coupler is used in the red-, green- and blue-sensitive layers. The latent image in the different layers forms a different colored dye when the film is developed.

Advertisement

  • Red-sensitive layers form a cyan-colored dye.
  • Green-sensitive layers form a magenta-colored dye.
  • Blue-sensitive layers form a yellow-colored dye.

The development process is stopped either by washing or with a stop bath. The unexposed silver-halide grains are removed using a fixing solution. The silver that was developed in the first step is removed by bleaching chemicals.

The negative image is then washed to remove as much of the chemicals and reaction products as possible. The film strips are then dried.

The resultant color negatives look very bizarre. First, unlike your black-and-white negative, it contains no silver. In addition to being a color opposite (negative), the negatives have a strange orange-yellow hue. They are a color negative in the sense that the more red exposure, the more cyan dye is formed. Cyan is a mix of blue and green (or white minus red). The overall orange hue is the result of masking dyes that help to correct imperfections in the overall color reproduction process. The green-sensitive image layers contain magenta dye, and the blue-sensitive image layers contain yellow dye.

The colors formed in the color negative film are based on the subtractive color formation system. The subtractive system uses one color (cyan, magenta or yellow) to control each primary color. The additive color system uses a combination of red, green, and blue to produce a color. Your television is an additive system. It uses small dots of red, green, and blue phosphor to reproduce a color. In a photograph, the colors are layered on top of each other, so a subtractive color reproduction system is required.

  • Red is controlled by Cyan dye
  • Green is controlled by Magenta dye
  • Blue is controlled by Yellow dye

Making the Prints: Black & White

­Color negatives are not very satisfying to look at. They are small, and the colors are strange to say the least. In order to make a color print, the negatives must be used to expose the color print paper.

Color print paper is a high-quality paper that is specially made for this application. It is made waterproof by extruding plastic layers on both sides. The face side is then coated with light-sensitive silver-halide grains that are spectrally sensitized to red, green and blue light. Since the exposure conditions for a color print paper are carefully controlled, the paper's layer structure is much simpler than that of the color negative film. Once again, gelatin plays a key part as the primary binder that holds the image-forming grains and the color-forming components (couplers) together in very thin, individual layers on the paper surface.

Advertisement

Let's start with a black-and-white negative and make a print. You have the choice of an enlargement or a direct-contact print. If you want a larger size print than the original negative, you will need an enlarger, which is basically a projector with a lens for focusing the image and a controlled light source. The negative is placed in the enlarger, and it is projected onto a flat surface that holds the paper. The image is carefully examined to ensure that it is in focus. If not, adjustment can be made to the lens and projection length. Once the size of the image and its focus are satisfactory, all the lights are shut off, and the black-and-white paper is placed onto the flat surface. The paper is exposed for a specified amount of time using the light from the enlarger. A latent image is formed in the exposed silver grains. This time, the densest areas of the negative receive the least amount of light, and therefore become the brightest and most reflective parts of the prints. The development process is much the same as for the black-and-white negative film, except the paper is much larger than the film, and agitation of the processing chemicals becomes more critical and more difficult. The final image is actually developed silver, and by carefully washing the prints to remove all the unwanted materials, these prints can last a very long time.

Making the Prints: Color

This figure shows a magnified cross-section of a color negative film exposed to white light and then processed. White light passes through the film to form blue light, which activates the blue-sensitive layer on the color print paper to create yellow dye.

­Prints from color negatives are usually done by a large central lab that handles printing and processing for many local drug stores and supermarkets, or they may be done in-house using a mini-lab. The mini-lab is set up to do one roll of film at a time, whereas the product houses splice many rolls together and handle a high volume of pictures on a semi-continuous basis. In either case, the steps are the same as already discussed for generating a black-and-white negative image. The major difference comes in the printing process, where long rolls of color paper are pre-loaded into a printer. The roll of negatives is loaded, and the printer operator works in normal lights to preview each negative and make adjustments to the color balance. The color balance is adjusted by adding subtractive color filters to make the print more pleasing, particularly when it has been exposed incorrectly. There is only so much correction that can be done, so don't expect miracles. Once a full roll of paper is exposed, or a single roll of film has been printed (in the case of a mini-lab), the paper is processed.

Here are the steps in developing the color print paper after it is exposed:

Advertisement

  1. The latent-image sites are developed, and oxidized developer molecules combine with the color-forming couplers to create a silver image and a dye image. The reaction is stopped by a washing step.
  2. The silver image and any remaining unexposed silver halide is removed in a combined bleach-plus-fix solution (called the BLIX).
  3. The print is then carefully washed to remove any residual chemicals.
  4. The print is dried.

Once again, the gelatin binder swells to allow the processing chemicals access to the silver-halide grains, and allows fresh water to rinse out the by-products. The colored image should contain no residual silver.

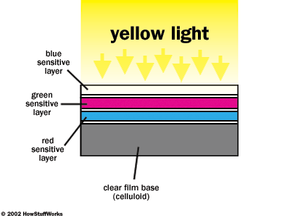
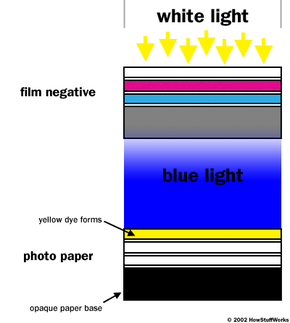
As a final example of color printing process, let's take a look at our negative that was exposed to a pure yellow object. When the resultant negative is placed in the printer, and white light is shown through the negative onto the color paper, here is what happens. The white light exposure is the equivalent of a color print exposure. Only blue light gets through the color negative and exposes the color paper. The exposed color paper then forms yellow dye in the blue-sensitive layer, and the original color is reproduced.

If you've made it this far, you are to be congratulated! Photography isn't as easy as it seems, but then again, that is what makes it so remarkable. The ability to capture and record individual photons of light and turn them into a lasting memory requires many steps. If any one of them goes wrong, the entire result may be lost. On the other hand, when all the stuff works, the results are truly astounding.

For more information on photographic film and related topics, check out the links on the next page.

Lots More Information

Related Articles

More Great Links

About the Author

Mr. Woodworth, or Chuck as he prefers to be called, grew up in a family that loved to take pictures. When he graduated from the University of Pennsylvania as a chemical engineer, he was lured back to his home state of New York to work for the Eastman Kodak Company. He worked there for 29 years in manufacturing process development, sensitized product development, product engineering, and as a technical supervisor. He is now semi-retired in the foot-hills of North Carolina, where he enjoys driving his 1967 Austin Healey and occasionally racing his 1959 Alfa Romeo as a member of the Vintage Sports Car Club of America. He still loves photography in digital or conventional form. His wife is a teddy bear artist who has sold her one-of-a-kind creations to customers around the world.