5 Photography Techniques Everyone Should Know

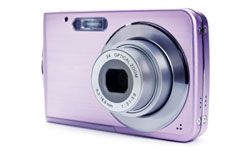
purple point-and-shoot digital camera
This purple point-and-shoot may not have lots of bells and whistles, but even a basic digital camera like this one can yield fantastic photos. See more camera stuff pictures.
iStockphoto/Thinkstock

Photography has never been easier. Modern point-and-shoot cameras give amateurs access to many of the same techniques that professionals use to produce high-quality pictures.

And these cameras are growing more capable every year. High-capacity memory cards let you store hundreds of pictures. Zoom lenses offer versatility. Even 3-D cameras are starting to become available. Today, a relatively inexpensive point-and-shoot can give you all the tools you need to take top-notch photos. What's more, digital-editing programs offer you a virtual darkroom on your computer.

Advertisement

Technology has made many aspects of photography automatic. Cameras focus for you, set the color balance and determine the exposure. Some adjust for your shaky hand or identify and focus on the faces of people in your picture.

But remember that photography is about more than equipment. It's not your equipment that takes good pictures, any more than it's your pots and pans that cook a great meal. You, the photographer, are what makes a good picture -- or a bad one. How you use your camera's features is more important than the technology itself, and your eye is the most valuable tool you have.

We're going to be focusing on digital photography here for a simple reason: Taking pictures with film has become a thing of the past for most amateur photographers [source: Yolles]. But remember that many of the same techniques apply whether you're shooting digital or film.

Read on for five easy techniques that will make you a better photographer.
5: Adjust the Light

Think about it: What is a photograph? It's a record of light, nothing more or less. Many amateur photographers take light for granted. In fact, judging and adjusting the light is the key to taking good pictures.

Diffuse light is better for picture taking than direct sunlight, which creates shadows and glare that can ruin a photo. Photographers love to shoot in early morning or evening when the sun is low. A cloudy day is better than a sunny one. If you have to shoot at midday, move your subject into the shade.

Advertisement

A flash can help if you use it properly. The pop-up flash on your camera is most valuable as a fill flash [source: Story]. Use it to light your foreground subject when the background is already bright. It will eliminate shadows and give the subject the correct exposure. Be careful when using a flash in low light: It bleaches colors and washes out your subject. And keep in mind that the light from most built-in flashes reaches less than 15 feet (nearly 5 meters) [source: Kodak].

You can shoot indoors without a flash. Just move your subject near a window. A bright, north-facing room is ideal [source: Halford]. Use a piece of white poster board to reflect light onto the subject and improve your picture [source: Bezman Lighting].

4: Master the Focus Lock

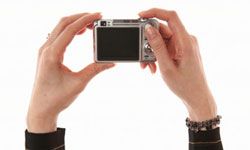
hands holding camera and pressing button
Fiddling with your focus lock can help you avoid some of the pitfalls of the autofocus feature -- and improve your picture-taking skills.
Thomas Northcut/Photodisc/Thinkstock

The autofocus feature that comes with most cameras makes picture taking easy. But it can ruin your photos as well as improve them. The problem is that the camera usually focuses on an area in the center of the scene you're framing. If your subject happens to be off to one side, oops.

Learn how your autofocus works. On many cameras, you can adjust the setting, moving the focus area off dead center. Then experiment with focus lock. Point the camera at your main subject and depress the shutter release halfway. Hold it there. Move the camera until you have the composition you want. Push the button the rest of the way. Your subject will remain in focus and will be properly exposed. If you become adept at this technique, you will avoid those pictures in which the background is sharp but your main subject is fuzzy [source: Digicam AE-Lock].

Advertisement

Focus lock also speeds picture taking. After you press the shutter to take a picture, there's a slight delay while the camera adjusts the focus. Holding the button halfway down leaves you ready to take the picture instantly, which can be important with action shots. Make sure that you determine how far away the subject will be when you take the picture and lock the focus on that distance [source: Photo-John].

3: Learn to Use a Tripod

A tripod is one of the most valuable pieces of equipment for amateur photographers and, because they mean carrying around an extra piece of equipment, one of the most neglected.

Start using a tripod and you're almost guaranteed to take better photos. There are many lightweight and inexpensive models to choose from, including tabletop varieties and ones that are little more than a clamp with a camera attachment [source: Calumet].

Advertisement

One reason that tripods are useful is that digital cameras are generally quite light in weight. That's handy, but it also makes them harder to hold absolutely steady when you press the shutter. And while some digital cameras can compensate for hand shake, a tripod lets you take the clearest pictures possible.

Tripods are great for shooting in low light. They let you take much longer exposures. This gives you crisper pictures and means you can increase your depth of field, the area that's in focus, by narrowing the camera's aperture. Taking pictures in low light without a flash can give you dramatic results.

A tripod also comes in handy when shooting with a telephoto lens, or when your zoom lens is on its maximum telephoto setting. A telephoto lens magnifies the image, but it also exaggerates any camera movement [source: Roberts].

Another big advantage of a tripod is that it forces you to slow down and look at the composition of your picture. You can set up the picture then adjust the lighting, change the focus or rearrange your subject. A tripod even enables you to get into the shot yourself, eliminating the "missing photographer" syndrome [source: Story]. Simply set the self-timer and move in front of the camera.

2: Learn the Rule of Thirds

The rule of thirds is a technique that was developed long before photography was invented and is still used today in other visual arts, like painting.

It's a basic skill for improving the composition of your pictures. And a thoughtful composition is the main difference between amateur snapshots and professional-quality photographs.

Advertisement

Imagine a grid of four lines, two horizontal and two vertical, that divides the picture plane into thirds [source: Stephenson]. You end up with nine equal sections. Try to place your main subject at one of the four spots where the lines intersect. That means not in the middle and a bit higher or lower than center.

When shooting a landscape, put the horizon at one of the horizontal lines. Use the upper one if you want to emphasize the foreground. Place the horizon at the lower line to make the background more prominent. Align buildings or other straight objects with one of the vertical lines [source: Photographymad].

You need to be aware of the rule of thirds, not obsess over it. Sometimes breaking the rule will give you a great picture, too [source: Rowse]. But knowing the principle lets you analyze pictures and see how they could be improved.

1: Read Your User's Manual

Reading the user's manual or guide may not seem like much of a technique. Most of us would rather run out and shoot pictures rather than wade through 150 pages of instructions. But reading about and understanding the features of your camera can make you a far better photographer.

To begin with, it will familiarize you with all those buttons, dials and menus. Most cameras today have a host of useful functions. You'll probably never use all of them, but many can be valuable for improving your picture taking:

Advertisement

  • Learning about aperture priority can help you to control the depth of field, bringing a large range into focus or blurring the background when you want to.
  • Changing the ISO setting can make your camera more sensitive to light, and it can also reduce picture quality.
  • Adjusting the white balance will yield better pictures when you're shooting in artificial or colored light.
  • Exposure bracketing means taking three pictures: one at the correct exposure, one underexposed and one overexposed. This technique is helpful in difficult lighting situations.

Remember that just reading the manual is not enough. You need to experiment with each of the features and see how they affect the pictures you take. But don't try to master the whole thing at once; read up on one feature and use it before moving on.

Lots More Information

Related Articles

  • Bezman, Robert. "Understanding and Using Photography Lighting." Best Family Photography Tips.com. (Jan. 26, 2011)http://www.best-family-photography-tips.com/photography-lighting.html
  • Bezman, Robert. "Tripod Photography." Best Family Photography Tips.com. (Jan. 26, 2011)http://www.best-family-photography-tips.com/tripod-photography.html
  • Calumet Photo. "Clamp Tripod." (Jan. 26, 2011)http://www.calumetphoto.com/1/3/clamp-tripod
  • Digicam. "Memory Card Capacity." (Jan. 26, 2011)http://www.digicamhelp.com/accessories/memory-cards/capacity/
  • Digicam. "AE-lock and AF-lock." (Jan. 26, 2011)http://www.digicamhelp.com/taking-photos/advanced-techniques/ae-af/
  • Fujifilm. "Fujifilm Introduces the World's First 3D Digital Camera." Aug. 17, 2010. (Jan. 26, 2011)http://www.fujifilmusa.com/press/news/display_news?newsID=879882
  • Halford, Elizabeth. "5 Tips for Consistently Good Photos Indoors." Digital Photography School.com. (Jan. 26, 2011)http://www.digital-photography-school.com/5-tips-for-consistently-good-photos-indoors
  • Howell, Tony. "Photography Tips and Techniques." Tony Howell.co.uk. (Jan. 26, 2011)http://www.tonyhowell.co.uk/phototips.htm
  • Kodak. "Top 10 Tips for Great Pictures." (Jan. 26, 2011)http://www.kodak.com/eknec/PageQuerier.jhtml?pq-path=10032&pq-locale=en_US&_requestid=38800
  • Lightscoop. "What is a Lightscoop?" (Jan. 26, 2011)http://www.lightscoop.com/what-is-lightscoop.html
  • Manfrotto. "Tripod Basics." (Jan. 26, 2011)http://www.manfrotto.com/Service/How+To+Lessons/Tripod+Basics/Tripod+Basics/3670824
  • Photographymad.com. "10 Top Photography Composition Rules." (Jan. 26, 2011)http://www.photographymad.com/tips/view/10-top-photography-composition-rules
  • Photo-John. "Point-and-Shoot Digital Camera Tips." Photography Review.com. (Jan. 26, 2011)http://www.photographyreview.com/digitalcameratips3crx.aspx
  • Ritzpix. "Improving your lighting." (Jan. 26, 2011)http://www.ritzpix.com/net/phototips/Lighting.aspx
  • Roberts Web Photo School. "How to Use a Tripod: The Basics." (Jan. 26, 2011)http://roberts.webphotoschool.com/How_to_Use_a_Tripod__The_Basics/index.html
  • Rouse, Darren. "Break the Rule of Thirds." Digital Photography School.com. (Jan. 26, 2011)http://www.digital-photography-school.com/break-the-rule-of-thirds
  • Stephenson, Kleber. "Taking Better Pictures: Composition." Microsoft.com. June 20, 2005. (Jan. 26, 2011)http://www.microsoft.com/windowsxp/using/digitalphotography/learnmore/composition.mspx
  • Story, Derrick. "Top Ten Digital Photography Tips." O'Reilly.com. Sept. 6, 2005. (Jan. 26, 2011)http://oreilly.com/pub/a/mac/2002/10/22/digi_photo_tips.html
  • Varp. "If your photographs are not good enough, you are not close enough." Varp.net. (Jan. 26, 2011)http://www.varp.net/photos/altindex.html
  • Watercolorpainting.com. "Composition: The Rule of Thirds." (Jan. 26, 2011)http://www.watercolorpainting.com/composition_rule_of_thirds.htm
  • Yolles, James. "Film camera loyalists fear their days are numbered." March 3, 2009. Columbia News Service. (Jan. 26, 2011)http://jscms.jrn.columbia.edu/cns/2009-03-03/yolles-cameras.html

Advertisement

Loading...