5 Tips for Photography Lighting

We've compiled a list of five ways you can use proper lighting to take better pictures. See more pictures of cool camera stuff.
iStockphoto/Thinkstock

With all of the technology available, taking great photographs should be a snap, right? After all, today's cameras have technology that lets them find and focus on faces, reduce red eye and compensate for most lighting situations. Still, anyone who has ever had a picture turn out less than perfect can tell you that cameras aren't perfect, no matter how advanced they are.

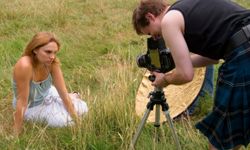
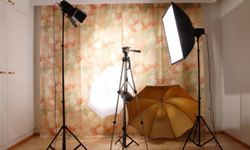
While you or your camera can't do anything about the fact that your Aunt Ida has a giant hairy mole or that Uncle Mort wears truly hideous sweaters, you can take some steps to make sure that the pictures you take are the best they can be. Much of a picture's quality comes from how well it's lit. By taking a few simple steps to make sure the lighting in your photographs matches up with the kind of picture you want to take, you can really improve the pictures you take. Who knows? You might even make Ida's mole or Mort's sweaters look a little better.

Advertisement

Keep reading to learn 5 ways you can use proper lighting to take better pictures.

5: Take it outside!

Take advantage of one of the best light sources around: the sun.
Jupiterimages/Brand X Pictures/Thinkstock

Photos that are taken outside take advantage of one of the best light sources around: the sun. Sunlight tends to be rich and warm, which makes everyone look good. That said, when taking pictures outside, you should follow some basic rules.

First, avoid shooting on bright, cloudless sunny days. Too much sunlight can wash your subjects out. Plus, strong light means strong shadows. If you're taking pictures of people, those shadows can wind up on their faces (and no one wants to see the kind of shadow Aunt Ida's mole casts). Cloudy days are actually great for taking pictures. The clouds defuse the light, softening it but still showcasing rich colors. Plus, the diffused light will cast fewer shadows. If you have to take pictures on a bright sunny day, try to avoid taking pictures in the middle of the day, when the sun will be at its brightest. If you're taking pictures of people outside, taking them in the middle of the day can result in people squinting into the camera.

Advertisement

If it's a bright sunny day and you're taking pictures, look for ways to diffuse the light yourself. Open shade trees are a good way to do it. Look for a large tree with a wide spread of branches that are fairly high off the ground. The leaves will catch most of the light but will also let just enough in so your subject isn't completely in the dark. Just watch out for any harsh shadows -- especially on your subject's face.

4: Get in Position

Harsh light will make your subject squint -- and the result is usually unflattering.
Stockbyte/Thinkstock

You may not be able to control your light source, but you can control where you and your subject are relative to it. Try to have your light source to the side of your subject. If the light is behind your subject, you won't get to see any detail -- instead, you'll just see a silhouette. On the other hand, if your subject is looking into the light, he or she may be squinting. Plus, direct light on an object or someone's face may be harsh and unflattering.

Photos with the best lighting tend to have the light source to the side. You'll want to make sure that they light source isn't too harsh -- otherwise you'll get shadows on one side of your subject. If possible, go for two light sources, one on either side of your subject. That way, the lighting will be even and you'll be able to see the subject clearly.

Advertisement

No matter where your light source is, before you snap a picture, take a second to look for any stray shadows. If you're shooting indoors and using a flash, move your subject away from any walls -- you don't want a shadow outlining him or her, even if the subjects themselves are well exposed.

3: Your Flash is Your Friend

You shouldn't rely on a flash to light your scene for you.
George Doyle/Stockbyte/Thinkstock

If you just can't seem get enough light on your own, a flash is a great way to add some, but you'll need to make sure you're using it correctly. Get familiar with your camera's owner's manual -- it'll have handy tips and tricks specific to your make and model of camera, even if you just use a simple point-and-shoot.

You shouldn't rely on a flash to light your scene for you. Instead, use your flash to fill out the light in a scene, eliminating shadows. For example, if you wanted to take a picture of something by a bright window, you'd likely only get a silhouette, since all the light would be coming in from the window behind your subject. But, by using your flash to fill in the scene, you'll illuminate the details on the front of your subject, too.

Advertisement

You may also want to use different flash setting for different situations. Some cameras have a red-eye reducing flash setting that flashes one light before the photograph is taken, and one while the photograph is being taken. That helps reduce the red eye effect you'll see in a lot of photos.

Even when using a flash you still have to pay attention to your position and the position of your subjects. Don't use a flash around reflective surfaces like mirrors or windows -- all you'll get is a picture of the flash reflected back at you. And remember: Flashes aren't all-powerful. For the flash to work as it's supposed to, you'll need to put your subject within the range of your flash. Also, if you're taking a group picture with the flash, everyone should be about the same distance from the flash. Otherwise, some people will appear over exposed while others will be under exposed.

2: Don't Refuse to Diffuse

Sometimes a photographer or the photographer's assistant uses a white or metallic cloth stretched over a frame to reflect light onto the subject.
©iStockphoto.com/Thinkstock

We've already mentioned that clouds and trees can be natural light diffusers, but don't be afraid to come up with your own methods for diffusing light, or reflecting it gently where it's needed.

Creating a diffuser or a reflector is actually pretty easy. If you're inside and have only one harsh light source, like a lamp, simply put a piece of paper or a light cloth over it. If you're outside, a light-colored umbrella positioned between your subject and the sun can diffuse the light -- just make sure the umbrella itself isn't in your photograph's frame.

Advertisement

Reflectors are a good way to reduce shadows and improve light in a photograph. If you've ever seen a professional photo shoot, you may have seen the photographer or the photographer's assistant using white or metallic cloth stretched over a frame to reflect light onto the subject. You can do the same thing. A white tablecloth can reflect light onto a subject (this is a great tip if you're taking photos by candlelight). If you're outside, a white cooler lid placed below your subject can throw light upward. You can also reflect light by wrapping tinfoil around some cardboard. Play around with different methods and materials until you find some that work for you. As an added bonus, you'll have them in your photographer's tool kit, ready for the next time when the lighting is less than ideal.

1: Hold Still

If your camera's shutter stays open longer than usual, any motion, whether it's your subject moving or you moving the camera, will be captured as a blur on your picture.
iStockphoto/Thinkstock

A lot of the time, if you're shooting photographs in dim light, you won't want to use your flash. The flash will only illuminate a small part of the photograph, and there may be too much contrast between the area of the flash and the rest of the picture.

If you can't add more light to a scene, you'll need to give your camera more time to bring what light there is into its lens. That means a slower shutter speed and a wider aperture. For a lot of people that use popular point-and-shoot cameras, that means putting your camera into dim light or night-shot mode.

Advertisement

When your camera is in those modes, the shutter stays open longer than usual. That means that any motion, whether it's your subject moving or you moving the camera, will be captured as a blur on your picture. If you're shooting in dim light, use something to steady the camera, like a tripod, or brace your arms on something stable. Press the shutter button slowly, and make sure your subjects are completely still. Having the shutter open longer increases the risk that your photo will be blurry, but it also lets your camera suck all the available light in from a dimly lit scene, which will result in a picture that's beautifully lit and evocative.

For more photography tips and information about other related subjects, follow the links on the next page.

Lots More Information

Related Articles

  • Kodak.com. "Lighting for Portraits." (Dec. 16, 2010)http://www.kodak.com/eknec/PageQuerier.jhtml?pq-path=424
  • Kodak.com. "Photographing in Dim Light." (Dec. 16, 2010)http://www.kodak.com/eknec/PageQuerier.jhtml?pq-path=38/13915/39/6370/183
  • Ritz Camera. "Digital Photography 101." Ritz Pix. (Dec. 16, 2010)http://www.ritzpix.com/net/phototips/Lighting.aspx

Advertisement

Loading...