How Astrolabes Work

By: William Harris  | 
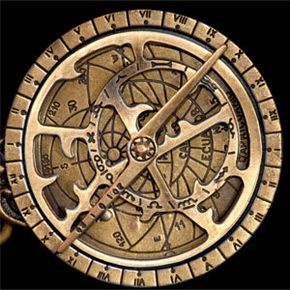
A brass astrolabe.
Once you learn how to use it, that brass astrolabe has a lot of information to impart.
iStockphoto/Thinkstock

Long before the Texas Instruments LED calculator, or even the slide rule, there was another type of computer: the astrolabe. The device took its name, ultimately, from the Greek word astrolabos, or "star-taking." Astrolabes were used primarily to make astronomical measurements, typically of the altitudes of celestial bodies, but astute philosophers, astrologers and sailors devised hundreds of uses for the instrument. The astrolabe was, without a doubt, the slide rule of the Middle Ages.

Today, although computers and other technologies have replaced them in practical astronomical and maritime applications, astrolabes continue to fascinate technophiles, science historians and amateur sky watchers. Many educators use the tool in their classrooms to teach about the celestial sphere and how to plot and predict a variety of astronomical phenomena, including sunrises/sunsets, moonrises/moonsets, star transits, retrograde motions and much more.

Advertisement

So what exactly is this astronomical instrument that compelled Geoffrey Chaucer to write about its structure and function in a 14th century treatise and then — nearly 620 years later — inspired Autodesk Fellow and software engineer Tom Wujec to demo a working replica for TEDGlobal? On the next few pages, we'll explore both the art and science — as well as the rise and fall — of astrolabes.

Advertisement

The Cosmic Ecliptic: History of the Astrolabe

Long before clocks and calendars, humans turned to the heavens to measure time and orient themselves on the planet. Ancient people observed cycles related to the motions of Earth, the sun and the moon and used these cycles to determine the length of days, months and years. They also watched the stars with great interest, arranging them into pictures — constellations — as a way to bring order to the mad chaos of the night sky.

Another organizing convention was the "celestial sphere," an imaginary globe thought to surround Earth. Like a traditional globe, the celestial sphere possessed north and south poles, an equator and coordinates similar to latitude and longitude. To an observer on Earth's surface, stars existed as fixed points of light on the inside of the sphere. The sun, moon and planets weren't fixed to the sphere, but moved around on a circular path known as the ecliptic.

Advertisement

Now imagine that you wanted to take the three-dimensional celestial sphere and project it onto a flat, two-dimensional surface. This was the fundamental problem that confronted scholars like Hipparchus, who was born in Nicaea in 180 B.C. Hipparchus kept meticulous records of 850 stars, an activity that led to the discovery of precession (wobbling of Earth on its axis) and to a unique way of describing a star's position.

The Greek astronomer was able to construct a map by imagining a perpendicular line connecting each star to a point on a plane corresponding to the plane of the Earth's equator. The map, which preserved the angular relationships among the stars, may have been the first example of stereographic projection.

Advertisement

From Ancient Greece to the Islamic World

Claudius Ptolemy drew heavily from Hipparchus as he prepared his magnum opus, the "Almagest," and other books. In "Planisphaerium," published in 150 A.D., Ptolemy provides a complete description, almost certainly based on ideas from Hipparchus, of the mathematical techniques required to project points on the celestial sphere. The book seemed to be a handbook to construct a working instrument, but no evidence exists suggesting he actually built an astrolabe. He did, however, design and build the armillary sphere, a complex predecessor of the astrolabe

The first authoritative account of what would become the modern, much-easier-to-use astrolabe came from Theon of Alexandria in 390 A.D. OK, so Theon didn't actually build an astrolabe, but historians think he did provide a full blueprint. And that blueprint would travel all the way to the medieval Islamic world.

Advertisement

When Islamic astronomers picked up Theon's treatise on astrolabes, they saw their value immediately. They began making and using the instruments — and composing their own manuals. The first astrolabe guides written in Arabic appeared in the eighth century. By the 11th century, the devices began appearing in Muslim Spain.

From there, it was hop, skip and a jump into Christian Europe, where astrolabes helped astronomers — and even gifted poets like Chaucer — bring order and stability to the night sky. They were an indispensable tool throughout the Middle Ages, until they became supplanted by newer, more specialized technologies, such as telescopes, sextants and pendulum clocks.

Advertisement

Of Alidades and Almucantars: Anatomy of an Astrolabe

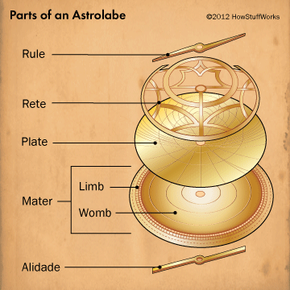
Diagram illustrating the components of an astrolabe.
Astrolabe diagram
©2012 HowStuffWorks

If you had an ancient astrolabe in front of you, whether it originated in 11th-century Islam or 16th-century Europe, it would come with the same basic parts. Here they are, working from the bottom of the instrument to the top:

Mater

The mater (Latin for "mother") served as the base of an astrolabe. This circular plate, usually made of brass, stretched about 6 inches (15 centimeters) in diameter and a quarter-inch thick. Its center was hollowed out so one or more plates could sit on top, nestled in the depression.

Advertisement

Limb

The rim of the mater, known as the limb, bore two scales — an inner scale for measuring hours of the day and an outer one for measuring degrees from 0 to 360. A throne bearing a ring sat above the noon marking, defining the top of the astrolabe and providing an attachment point. When he wanted to use the instrument, an astronomer would tie a rope through the ring and let the device hang straight down.

Plates

Next came a series of plates, with each plate corresponding to a specific latitude. This was necessary because an observer located at the equator saw a different section of the night sky compared to an observer, say, at mid-latitude. For the astrolabe to work properly, it needed a plate specific to a given latitude.

Each plate came engraved with two kinds of circles. The first were circles of constant altitude known as almucantars, with the horizon being the most important almucantar. The second were azimuths, which met the almucantars at right angles. The most important azimuth was the meridian.

Rete

The rete (sounds like "treaty") rested on top of the plates. Modern retes are often made of transparent plastic so you can see through them to the plates below. To get the same effect in the ancient world, astrolabe makers cut away large portions of the metal, leaving behind a skeletal-like ring.

The rete was marked with a number of stars and several important constellations. As it rotated around a central pin (the north celestial pole), the rete showed the daily motion of the celestial sphere. The perimeter of the rete contained an outermost scale divided into hours and an innermost scale marked with days of the year.

Rule and Alidade

On some astrolabes, a clocklike hand called the rule, marked with declinations from -30 degrees to +70 degrees, lay on top of everything. A pin passed through the center of the instrument, holding all of the pieces together, but allowing the rule and the rete to rotate over the plate.

The back of the instrument contained a variety of useful scales and tables. All astrolabes included scales for measuring angles and determining the sun's longitude for any date. Many also had scales to solve simple trigonometry problems. An alidade also attached to the back, allowing a user to measure the altitude of a celestial object.
Advertisement

Using an Astrolabe For Altitude Measurements

In the 10th century, Persian astronomer (and astrolabe adorer) Abd al-Rahman al-Sufi wrote a book claiming 1,000 uses for an astrolabe. The Persian may have been exaggerating slightly, but in the hands of a skilled practitioner, the instrument could provide answers to many problems. With an astrolabe, astronomers could calculate the position of objects in celestial spheres, the time of day (or night), the time of year, the altitude of any object, different latitudes, and much more.

One of the easiest calculations to make with a universal astrolabe is the altitude of an object above the horizon. The object could be anything — a tree, a mountain peak, a star. To find its altitude, follow these steps:

Advertisement

  1. First, attach a short length of rope, string or twine through the ring at the top of the astrolabe.
  2. Hold the rope so that the instrument hangs vertically.
  3. Turn the astrolabe so that its edge points toward your target.
  4. Rotate the alidade (the clocklike hand on the back of the astrolabe) until the object lines up with both ends, or vanes, of the dial. (Note of caution: Don't sight the sun by looking directly at it. Instead, you should adjust the alidade until the shadow of the upper vane falls on the lower vane.)
  5. Read the altitude of the object using the outermost elevation scale marked on the back rim of the astrolabe. This should tell you the object's elevation, in degrees.

Using an Astrolabe to Calculate the Sunset

Cool, huh? Now let's say you want to use the astrolabe to determine when the sun will set on a particular day. Here's what you do:

  1. Find the position of the sun on the target date. To do this, use the alidade on the back of the astrolabe, turning the dial until it points to the date on the calendar scale.
  2. Read the corresponding value from the zodiac scale.
  3. On the front of the instrument, rotate the rete until the specific zodiac value obtained in step 2 touches the western (right) horizon.
  4. Rotate the rule (the clock-dial on the front) until it touches the specific zodiac value.
  5. Read the local solar time from the time scale on the limb.

More fun hands-on stuff next.

Advertisement

Telling Time With Your Amazing Astrolabe

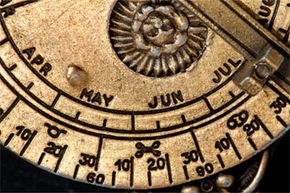
Names of months and dates shown on an astrolabe.
With a few twists and turns of your astrolabe, you can tell time. Relax. It's not as hard as you think once you get the hang of it.
iStockphoto/Thinkstock

Did you lose your smartphone? No worries, just pull out your astrolabe to find the time of day or night. During the day, you would base your calculations on the altitude of the sun. At night, you would use the altitude of a visible star. As an example, let's walk through the steps to determine the time of night:

  1. First, you must convert the current calendar date to a zodiac date, as we did in the previous exercise. Turn the alidade until it points to the date on the calendar scale, then read the corresponding value from the zodiac scale.
  2. Now you need to find a suitable reference star. Remember, people in the ancient world would have been intimately familiar with the night sky and would have known the major constellations. As the eighth brightest star in the sky and the brightest in the constellation Canis Minor, Procyon would have been a familiar beacon and would have appeared on most astrolabes. As a result, we'll use Procyon as our reference star.
  3. Find the altitude of Procyon following the same steps given in the first exercise.
  4. Now turn the astrolabe over and find the target star on the rete.
  5. Rotate the rete until the target star touches the altitude line matching the value you calculated in step 3.
  6. To find the time, rotate the rule until it touches the specific zodiac value. Then read the time from the outer rim.

The website of the Oxford Museum of the History of Science provides an excellent interactive demo of this last exercise, using a replica of an ancient astrolabe. As it steps you through the process, it also shows the markings on the instrument's various scales.

Advertisement

Getting Your Own Astrolabe

If you're an astronomy buff, you've probably already invested in a good telescope. Now you might want to add an astrolabe to your collection. The simplest thing is to buy an astrolabe that's ready to go right out of the box. You can find some antique astrolabes on eBay, although any pre-20th-century instrument will set you back some serious dough.

A better option is to buy a replica, which will give you an authentic ancient-astrolabe experience without the hefty price tag. You can source a plane astrolabe and other varieties on many websites.

Advertisement

Modern materials do offer some advantages over brass and pewter. A good blend of old and new schools comes from Janus, a Delaware-based company behind several popular astrolabe resources. If you really want to kick it old school, you'll want to build your own astrolabe from scratch.

To get the full experience, start by reading "A Treatise on the Astrolabe," the first English-language manual on the instrument. James E. Morrison, the owner and creator of Janus and The Personal Astrolabe, has translated Chaucer's work out of Middle English into kinder, gentler language we all can understand (a PDF of the translation is available here).

Advertisement

Building Your Own Astrolabe

To build an astrolabe you can use as you read the 14th-century treatise, your best bet is to start with pre-existing templates. In "The History and Practice of Ancient Astronomy" (Oxford University Press, 1998), author James Evans provides a set of complete patterns to make an astrolabe. You simply photocopy the patterns onto paper (or onto an acetate transparency in the case of the rete), glue them down to card stock, cut out the parts, punch a hole in the center and bind everything together using a bolt and nut. He specifically provides patterns for two altitude plates — Seattle and Los Angeles — but you can also find others in the body of the book.

Another great resource is a hands-on astrolabe activity developed by the Institute for Astronomy at the University of Hawaii. The website includes a program that calculates a complete set of astrolabe templates for any location. Once you specify your location, the program generates files you can save to your computer or print out.

Advertisement

No matter which route you take, store-bought astrolabe or DIY, you'll possess your own version of the world's first analog computer. And with it, you'll have a greater understanding of the night sky — and a deeper connection to the world of ancient astronomy.

Astrolabes FAQ

What are astrolabes used for?
Astrolabes are simple yet powerful astronomical devices used for the purpose of observations, analog calculations and reckoning time. They were also used to measure altitudes of celestial bodies, allowing astronomers to identify the sun’s position and the location of other heavenly bodies.
Are astrolabes still used today?
Although astrolabes are very ancient devices and have been replaced by modern computer technology, they are still used today as part of learning ancient astronomy. Centuries back, astrolabes were a high-tech invention that led astronomers to navigate and calculate distances above the horizon.
What's the difference between a sextant and an astrolabe?
A sextant was used even before astrolabes came into existence. The primary purpose of a sextant was to calculate the angle between the horizon and heavenly bodies like stars, the sun, the moon, etc. Astrolabes, on the other hand, were used to calculate distances between celestial bodies.
Who invented the astrolabe and when?
Astrolabes are believed to have existed since 220 B.C.E. or even earlier. Their invention is credited to mathematician Apollonius of Perga who lived in the Hellenistic period.
Why are astrolabes important to Muslims?
Astrolabes hold a spiritual significance for Muslims around the world. They use them to find the direction of Mecca, also called the Qibla. This aids Muslims in performing prayers in the true direction of the holy city of Mecca.

Lots More Information

Related HowStuffWorks Articles

  • Deakin, Michael A.B. "Hypatia and Her Mathematics." The American Mathematical Monthly. March 1994. (April 17, 2012) http://www.maa.org/pubs/Calc_articles/ma055.pdf
  • Encyclopaedia Britannica Online. "astrolabe." Encyclopaedia Britannica Inc., 2012. (April 17, 2012) http://www.britannica.com/EBchecked/topic/39959/astrolabe
  • Evans, James. The History and Practice of Ancient Astronomy. Oxford University Press. 1998.
  • Janus. "The Astrolabe: An instrument with a past and a future." (April 17, 2012) http://www.astrolabes.org/index.htm
  • Meech, Karen. "Astrolabes." Institute for Astronomy, University of Hawaii. Last updated May 12, 2003. (April 17, 2012) http://www.ifa.hawaii.edu/tops/astlabe.html
  • Morrison, James E., ed. "Chaucer's Astrolabe Treatise." (April 17, 2012) http://www.chirurgeon.org/files/Chaucer.pdf
  • Museum of the History of Science, Oxford. "Using an astrolabe to tell the time." (April 17, 2012) http://www.mhs.ox.ac.uk/exhibits/using-anastrolabe/
  • Rees, Martin. "Universe: The Definitive Visual Guide." Dorling Kindersley Limited. 2008.
  • Starry Messenger. "Western Astrolabe Tour." The Department of History and Philosophy of Science of the University of Cambridge. 1999. (April 17, 2012) http://www.hps.cam.ac.uk/starry/waslabe.html
  • TED Talks. "Tom Wujec demos the 13th century astrolabe." TEDGlobal 2009. Filmed July 2009. (April 17, 2012) http://www.ted.com/talks/tom_wujec_demos_the_13th_century_astrolabe.html

Advertisement

Loading...