How to Build a Computer

Building your own computer can result in a custom machine at a cheaper cost.
HowStuffWorks

Have you ever thought about building your own computer? Actually buying a motherboard and a case ­along with all the supporting components and assembling the whole thing yourself?

Here are three reasons why you might want to consider taking the plunge:

Advertisement

  1. You'll be able to create a custom machine that exactly matches your needs.
  2. It will be much easier to upgrade your machine in the future because you'll understand it completely.
  3. You may be able to save some money.

And, if you've never done it before, you'll definitely learn a lot about computers.

­In this article, we'll take you through the entire process of building a computer. You'll learn how to choose the parts you'll use, how to buy them and how to put them all together. When you're done, you'll have exactly the machine that you need.

­The first step in building a computer is deciding what type of machine you want to build. Do you want a really inexpensive computer for the kids to use? A small, quiet machine to use as a media computer in the living room? A high-end gaming computer? Or maybe you need a powerful machine with a lot of disk space for video editing. The possibilities are endless, and the type of machine you want to build will control many of the decisions you make down the line. Therefore, it's important to know exactly what you want the machine to accomplish from the start.­

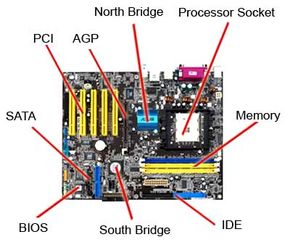
­Let's imagine that you want to build a powerful video-editing computer. You want it to have a quad-core CPU, lots of RAM and at least 2 terabytes of disk space. You also want to have FireWire and USB 3.0 ports on the motherboard. Look for a motherboard that supports:

  • Quad-core CPUs (either Intel or AMD)
  • At least 8GB of high-speed RAM
  • Four (or more) SATA hard drives
  • FireWire connections (possibly in both the front and back of the case)
  • USB 3.0 ports

­Then it all needs to go in a case with enough space to hold multiple hard disks and enough air -flow to keep everything cool.

With any computer you build, knowing the type of machine you want to create can really help with decision-making.

Advertisement

Choosing a Motherboard

A middle-of-the-road motherboard

Choosing a motherboard is the most interesting part of any building project. There are hundreds of motherboards to choose from and each has its own advantages and disadvantages.

One easy way to think about motherboards is to break them up into a few categories. For example:

Advertisement

  • Cheap motherboards: Generally in the $50 range, these are motherboards for older CPUs. They're great for building inexpensive machines.
  • Middle-of-the-road motherboards: Ranging in price from $50 to $100, these are one step up from the cheap motherboards. In many cases you can find motherboard and CPU combos in this price range, which is another great way to build a cheap machine or an inexpensive home/office computer.
  • High-end motherboards: If you're building a powerful gaming machine or video workstation, these motherboards give you the speed you need. They range in price from $100 to $200. They handle the latest CPU chips at their highest speeds.
  • Extreme motherboards: Falling into the over-$200 range, these motherboards have special features that boost the price. For example, they might have multiple CPU sockets, extra memory slots or special cooling features.

You need to decide whether you are building a "cheap machine," a "high-end machine" or a "tricked-out super machine" and then choose your motherboard accordingly. Here are some other decisions that help narrow down your motherboard choices:

  • Do you want to use an Intel or an AMD processor? Making this choice will cut the number of motherboards in half. AMD chips are often cheaper, but lots of people are die-hard Intel fans.
  • What size motherboard do you want to use? If you're trying to build a smaller computer, you may want to look at micro ATX cases. That means you'll need to buy a micro ATX motherboard. Otherwise you can use a normal ATX motherboard and case. (There are also smaller motherboard form factors like mini-ITX and even nano-ITX if you want to go really small.) The size of the motherboard determines the size of the case you'll need.
  • How many USB ports do you want? If you want several, make sure the motherboard can handle it.
  • Do you need FireWire? It's nice if the motherboard accommodates it (although it's also possible to add a card).
  • Do you want a PCI Express graphics card? Or do you want to use a graphics card on the motherboard to keep the price and size down? If you want to go the cheapest route, make sure the motherboard includes a video card on board (easiest way to tell is to see if there is a DVI or VGA connector on the motherboard). If you want an HDMI port, TV tuner or other video component, make sure the video card or cards you’ve chosen include them.
  • What pin configuration are you using for the CPU? If you want to use the latest CPUs, make sure that your motherboard accepts them.
  • Do you want to try things like dual video cards or special high-speed RAM configurations? If so, make sure the motherboard supports it.

If you don't care about any of this stuff (or if it all sounds like gibberish to you), then you're probably interested in building a cheap machine. In that case, find an inexpensive motherboard/CPU combo kit and don't worry about all of these details.

Advertisement

Picking Out Computer Parts

Once you've chosen your motherboard, you're ready to choose everything else. Make sure to get the CPU that's the right brand and the right pin configuration to fit your motherboard. Pick whichever CPU clock speed fits your budget and intentions. (If you purchase a motherboard/CPU combo, you can skip this step.)

What is clock speed? Essentially, it refers to how many instructions a CPU can execute in a second. For some processes, a really fast, single-core CPU may be better-suited than a slower multi-core processor. What’s best for you will depend on how you want to use your computer.

Advertisement

You'll need to use the RAM with the correct pin configuration that will match your motherboard. If your motherboard is using a specialty RAM configuration (normally to improve performance), make sure the RAM you buy matches its requirements. Some motherboards support RAM in pairs of memory sticks and others may require you to add three sticks at a time. Make sure you know which kind of motherboard you’re using before you buy RAM so that they match up.

If the case doesn't come with a power supply, you'll need to choose one. Make sure its connectors match the motherboard. Three hundred watts are enough for low-power machines, but if you're building a gaming machine with multiple video cards or a machine with lots of disks, you may want to consider something bigger. There are tools online that help you estimate how much power your computer will need based on the components you’re including in the machine. It’s a good idea to add another 10 percent to the power requirements. This will help guarantee your computer will have enough power and gives you the option of upgrading further down the road.

Choose a video card if you're not using the onboard video on the motherboard.

Choose an optical drive. If you are building a cheap machine, get the cheapest CD-ROM drive you can find. If you want to burn Blu-Rays, DVDs and CDs, make sure the drive can handle it.

Choose a hard disk -- or more than one. Check to see what your motherboard supports -- SATA 3.0GB/s or SATA 6GB/s. If your motherboard can support a SATA 6GB/s drive, you may want to invest in one. Most drives can run on SATA 3.0GB/s. If you want -- and your budget allows -- you can opt for a solid-state drive instead of or in addition to a hard drive. Solid-state drives take up less space, are faster and aren’t noisy but they’re also more expensive and tend to have lower storage capacity.

Choose an operating system: Microsoft’s Windows has widespread adoption, but make sure the version you buy has the features you want. There are other options -- if you prefer the Linux operating system you’ll find hundreds of variations online, some of which are free. And if you want a real challenge, you can attempt to build a hackintosh -- a non-Apple computer running the Mac operating system. But hackintoshes are notoriously tricky to build, they can be unreliable machines and you can’t expect to get any technical support from Apple.

Advertisement

Buying Your Components

Now that you've picked everything out, it's time to purchase your parts. You have three options:

  • Mail order on the Internet -- All kinds of stores sell computer parts on the Web. Visit multiple sites to compare prices. Don't forget about eBay.
  • A big national chain -- Places like Tiger Direct, Fry's, and Best Buy have stores in many large cities that will sell you parts. They also have people on staff who may be able to answer questions.
  • Local parts retailer -- Any big city will have a number of smaller, local shops selling parts. Look in the Yellow Pages or online.

The people working at a shop like this can often answer lots of questions, and they may also be willing to help you if your machine does not work after you assemble it.

Advertisement

Now that you have your parts, it's time to build. This is the fun part.

Advertisement

Installing RAM and the Microprocessor

But before we start building, we need to say one thing about static electricity. Most of the parts you'll be handling when you assemble your computer are highly sensitive to static shocks. If you build up static electricity on your body and a shock passes from your body to something like a CPU chip, that CPU chip is dead. You'll have to buy another one.

The way you eliminate static elec­tricity is by grounding yourself. There are lots of ways to ground yourself, but probably the easiest is to wear a grounding bracelet on your wrist. Then you connect the bracelet to something grounded (like a copper pipe or the center screw on a wall outlet's face plate). By connecting yourself to ground, you eliminate the possibility of static shock.

Advertisement

Each combination of parts is unique. But in general, here are the basic steps you'll need to follow when you assemble your machine:

­First, you'll need to unwrap the motherboard and the microprocessor chip. The chip will have one marked corner that aligns with another marked corner of its socket on the motherboard. Align the corners and drop the microprocessor into the socket. You don't need to apply any pressure - if it's aligned correctly, it should fall into place. Once you have it in, cinch it down with the lever arm.

Now, you need to install the heat sink. The CPU box will contain a manual that tells you how to do it. The heat sink will contain either a heat sink sticker or heat sink grease to use when mounting it on the CPU. Follow the instructions closely to install it. To install our heat sink, all we had to do was put it in place, cinch it down with flanges on either side and lock it with a cam. Connect the power lead for the heat sink to the motherboard.

Next, you'll install the RAM. Look on the motherboard for the slot marked "one" and firmly press the RAM module into it. It will probably take more pressure than you'd think to get the RAM into place. Each side of the module should also have a rotating arm that will lock the RAM down.

Now your motherboard is ready to put in the case.

Advertisement

Assembling the Case

Installing the power supply.

Next, you'll assemble the case. You'll need to install the power supply, the motherboard, a faceplate and standoffs to hold the motherboard in place. You'll also need to connect some wires to the motherboard.

Your motherboard should have come with a face plate for its back connectors. The case already has a hole cut in it for the plate, so you just need to put in the plate and press it until it clicks into place. Now you can put in the motherboard. It needs to sit about a quarter of an inch (6.4 millimeters) away from the case's surface so that none of­ its connectors touch the case. You'll accomplish this by­ placing spacers, which are also included with the motherboard.

Advertisement

Because each motherboard is different, you'll have to set it into the case first to see which screw holes on the motherboard match up with the pre-drilled holes in the case. Then you can take the motherboard back out, place the spacers, and put the motherboard in on top of them. Make sure that the motherboard lines up with the faceplate and the holes line up with the spacers.

Find the screws that fit (these should have come with the case) the spacers and screw down the motherboard. Don't screw them in too tightly -- they just need to be snug. Be very careful when putting in the screws. If you drop them into the case, they could damage the fine wires on the motherboard.

Now you can install the power supply in the case if it's not already installed. The power supply has two sides. The fan side faces outside the case and the wire side faces inside. Slide the power supply onto its brackets and secure it with screws (the case or the power supply should have come with them).

Connect the power leads to the motherboard. There should be a large one and a small one, and it will be obvious as to where each one goes.

You'll be left with about 15 more wires. Don't worry -- the manual has a page to tell you exactly where each one goes. Each of them has a label that corresponds to a label on the correct port.

Advertisement

Installing the Hard Drive

Placing the hard drive into its bracket.

The last steps are installing the hard drive -- or drives -- and the optical drive. The case has a removable bracket with four rubber grommets on it, which line up with four holes on the hard drive. It also should have come with four screws made just to punch through those grommets. Screw the hard drive into the bracket, then put the bracket back into its slot in the case. Then connect the hard disk to the power using one of the connectors coming off of the power supply. If it fits, then it's a match.

Now install the cables. One side of the cable has a red stripe on it, which makes it "pin 1." Look on the motherboard and hook the cable into the IDE connector marked "1." Insert the other end of the cable on the back of the drive. Now the drive is ready to go.

Advertisement

Install the optical drive next. Again, set the jumpers correctly. The drive fits in the front of the case, and you may have to pop out a faceplate to make room for it. Slide it in and screw it into place, making sure that it's aligned with the front of the case. Just as with the hard drive, you can use any available connector from the power supply. You'll also use the cable that came with the optical drive to connect it to the motherboard (align the red stripe for "pin 1") and plug the other end into the drive. Connect the audio for the optical drive. Again, there's an obvious place for it to plug in on the motherboard and on the drive itself.

If you're using a video card, now you'll install it as well. The motherboard only has one video-card slot, so you should be able to find it easily (you can also use the manual). Line up the card with the slot and push it into place. If the video card has its own power connector, connect it to the power supply. If the case has extra fans, make sure they have power too.

Now you can close up the case and add a monitor, keyboard, mouse and speakers. In the next section, we'll cover what to do after powering up the computer and what steps to follow if it doesn't work.

Advertisement

Powering Up Your Computer

Make sure that your motherboard is connected to the power supply.

Now, the moment of truth -- it's time to turn your machine on and see if it works. If there's a switch on the back of the power supply, make sure it's on. Also make sure that the power supply is set correctly to 110 or 220 volts (some power supplies do this automatically, others have a switch or a slider).

Then, push the power switch on the front of the case. In the ideal case, four things will happen:

Advertisement

  • You'll see/hear the fans spin up.
  • You'll hear the hard disk spin up.
  • Lights will light on the case.
  • You'll see something happening on the monitor to indicate that the motherboard is working.

If you see/hear all of that happening, you're successful. You've created a working machine. Using the manual that came with the motherboard, you can enter the BIOS screens and make sure everything looks OK. Chances are you'll need to set the machine's date and time, but that's probably all you have to do. Everything else is probably automatic. All the drives will be recognized and auto-configured. The default settings on the motherboard will be fine.

Advertisement

Troubleshooting

What if you put it all together and it doesn't work? This is the one possible downside of building your own machine. It is hard to describe the feeling you get when you try turning on the machine and nothing happens. You've put in several hours of work and a significant amount of cash, so it's discouraging to get no response.

All is not lost, however. Here are several items to check:

Advertisement

  • Is the power supply firmly plugged in and turned on (many power supplies have a small switch on the back)? Try a different outlet.
  • Did you plug the power supply into the motherboard? Look at the manual for details.
  • Is the case's power switch properly connected to the motherboard? If you've plugged the switch into the wrong pins on the motherboard, it won't work. Check the motherboard manual.
  • Are the drives connected to the motherboard properly? Do they have power?
  • Unseat and reseat the video card. If the motherboard has onboard video, try to remove the video card completely and boot using the onboard version.

If you've checked all of that and nothing continues to happen, it could mean:

  • The power supply is bad.
  • The switch on the case doesn't work. We actually had this happen once on a machine we built at HowStuffWorks.com.
  • Something is wrong with the motherboard or the CPU.

The easiest way to determine where the problem lies is to swap parts. Try a different power supply. Swap a different motherboard into the case. Play around with different combinations.

If it's still not working, then you have a few options. You can go back to the shop that sold you the parts. If you bought them from a small local shop, they can help you debug the problem (although it may cost you). If they sold you a bad motherboard (rare, but possible) they'll usually help you out. You can also try to find a more experienced builder who would be willing to help you. There's a rational cause for the problem you're experiencing -- either a bad part or a bad connection somewhere -- and you'll find it.

Now that you've seen how simple it is to build your own computer, we hope that you'll give it a shot. You'll have a computer that you understand completely and will be able to easily to upgrade. You can save money, and it's a lot of fun, too. So the next time you need a new computer, consider building it yourself!

Advertisement

Advertisement

Loading...