10 DIY Projects for Tech Nerds

Most adults remember their Lego days fondly. Don't worry -- one of these projects features your childhood favorite.
©pxhidalgo/iStock/Thinkstock

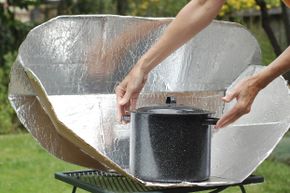
Do-it-yourself (DIY) projects entwine artistry and practicality. Create your own plans. Apply your mental fortitude. Add some elbow grease, and at the end, you're left with the fruits of your own hard work and flawless planning. Well, that's the idea, anyway.

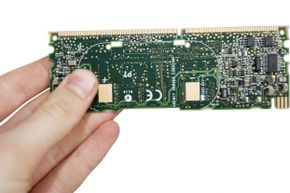
And when it comes to DIY projects, no one does it quite like nerds. You know exactly what we mean – the people who love to slave over minutia until they've perfected their projects, whether it's a homebrew computer or self-programmed smartphone app.

Advertisement

For you and your friends, we've rounded up 10 of our favorite nerdy DIY projects. Some of these will cost you some dough and require serious time to complete. Others are simple, fun, nearly free and demand only your unwavering dedication to completely nerding out.

10: A Greener Gaming Machine

Gaming computers are infamous for demanding a lot of power, but there are ways to green your machine.
© photovisionllc/iStock/Thinkstock

Forget tablets and smartphones; they're ponies. When it comes to play time, full-sized gaming computers are the true thoroughbreds. They're bigger, faster and more powerful than any other type of computer you'd find in most homes. And they aren't the most eco-friendly machines.

During a high-speed gaming session, these computers can suck down hundreds of watts worth of power, all in the name of running fast CPU, graphics processors and other high-end components. But there are ways to green your machine.

Advertisement

You can start by selecting components that devour less wattage, which is easy to do for a custom-built computer with parts that you select. Manufacturers are more sensitive to green concerns these days. Nvidia and AMD, for example, both produce power-sipping products for a variety of computing purposes. ASUS unleashed its Ge-Force GTX 650-E, a high-end graphics card for all sorts of gaming needs, which requires only around 60 watts at peak power.

And let's not overlook some of the most obvious pointers. Turn off your electronics when you're not using them. Or at the very least, use the power management features in your operating system so that your machine drops into low-power standby mode when idle.

9: Cooking with the Sun

Building a solar cooker is a simple task and requires common household supplies.
© ckellyphoto/iStock/Thinkstock

A solar cooker is a fundamental nerdy DIY project. Ditch the microwave or range. Cook using just the sun's rays instead! Yet many people bypass this incredibly useful tool because they think it's too hard to create.

It's easy to build your own solar cooker with household items, and you can use one of dozens of different (and free) plans that you find online. All of them use the same principles to heat food or beverages.

Advertisement

You're simply concentrating the sun's rays with a reflective material, such as foil or metal, toward a non-reflective (read: black) container that soaks up the light and helps turn it into heat. Cover the contraption with clear glass or plastic to trap heat and reduce heat loss to typical outdoors breezes ... and then wait.

Depending on the type of food you're cooking and the amount of sunlight available, it might take you half an hour or several hours to complete a particular dish. Once you're done, though, you'll literally be able to eat the results of your nerdy endeavor.

8: Snow and Ice Bike Tires

You could shell out a bunch of cash for snow and ice tires for your bike, but a little ingenuity can save you that money.
© Tommy Ingberg/iStock/Thinkstock

Bicycling is an efficient and health-conscious mode of transportation. And if you live in a region prone to icy winter weather, it's often treacherous, too. You can make your ride more secure by adding homemade snow and ice tires.

For starters, you'll need a set of tires that you don't mind puncturing. You'll turn the tires inside out and then drive screws (such as pan-head screws) so that the tips emerge through the riding surface of the tires. The exact length of the screws depends on your tire tread, but understand that you want the tip of screw to extend about a quarter inch past the rubbery knobs on your tires.

Advertisement

To get decent coverage, you'll probably need 200 or so screws. As you drive them through the tire, be sure not to twist the rubber. That may mean using a screwdriver or the low-torque setting on your drill. Use the same pattern all the way around the tire for consistent grip.

Install tire liners to protect the tube from the screw heads. And consider lowering your tire pressure a little for better traction in slippery conditions.

7: Touchscreen Gloves

Any pair of gloves can be touchscreen compatible with just the tiniest bit of stitching with conductive thread.
© AdamRadosavljevic/iStock/Thinkstock

You love your smartphone's glossy, high-resolution touchscreen. But that love goes a bit sour in the winter, when your gloves make it impossible to swipe and press those animated buttons. That's because most screens use capacitive technology, meaning the fingertip must be able to conduct an electrical impulse from your body to the screen.

Sure, you can buy those fancy gloves with built-in touchscreen fingertips, but, it's more fun to make your own. By tapping your inner seamstress you can make just about any gloves work with a touchscreen by sewing conductive thread into the fingers.

Advertisement

You won't want a full spool of this thread, because it's pretty expensive and you probably don't have dozens of gloves that you want to alter. With an Internet search, you'll find suppliers that offer smaller quantities for less than $10.

With the thread in hand (ha!) you'll simply sew a patch of the thread into the tips of the fingers that you use to control your phone. Then you can swipe and press that touchscreen to your heart's content, all without frigid, frostbitten fingers.

6: Hardcover Tablet Case

With a sharp blade, some glue and a bit of patience, you can turn a hardcover book into a retro case for your tablet.
© shandrus/iStock/Thinkstock

Tablet computers need protection from dropping and crushing. You can easily blow a good chunk of cash on a manufactured cover, or you can make something just as effective – and much cooler – by gutting an old hardcover book.

To begin, take your tablet on a shopping expedition to your local used bookstore. Cruise the aisles until you find a book of the desired width and height, and something with a spine that's just a bit thicker than your tablet.

Advertisement

Use a sharp razor knife to cut a tablet-sized rectangle in the pages themselves. This part of the job is time-consuming depending on the number of pages you have to remove. Once you're done cutting, use a small paintbrush to apply hobby glue to the cuts to make the pages stay together.

After the glue is dry, you can just drop your tablet into place. For extra security, you may want to attach small Velcro strips from the cover to the first page to keep the book shut if (or when) you drop it, ensuring that your tablet stays safe within the pages and not on the hard, heartless concrete sidewalk.

5: PCB Jewelry

Printed circuit boards can be cut, sanded and used as elements of jewelry.
©moodboard/Thinkstock

Don't hide your inner geek. Let your freak flag fly by making and then wearing jewelry salvaged from old electronics. Printed circuit boards (PCB) in particular are great for mixing and matching bits of components for unbeatably nerdy necklaces, bracelets, charms and more.

You can find PCB in all sorts of electronics. If you have an obsolete computer, for example, you can remove the motherboard, which is a mother lode of PCB for a major jewelry project.

Advertisement

After you find your PCB, you'll need to identify the parts you want to use and then cut them to size. This stuff is tough, so you need a saw (perhaps a hack saw) and a vise, miter box or other way to secure the PCB so it doesn't shift while you cut it. A dust mask, eye protection and gloves are NOT.

Once you've cut your pieces, you can drill holes for bracelet links or necklace fasteners, and then connect various pieces until your artistic muse is sated. File to remove sharp edges, and coat prickly parts (or just the whole piece) with clear epoxy to make your art more comfortable on the skin.

4: Customized USB Drive

Who doesn't have fun memories of building with Lego blocks? Use a brick to encase your thumb drive and carry the fun wherever you go.
© DK Limited/Corbis

USB drives come in all sorts of funky sizes and designs, but making your own custom design is even better. Get your geek on by creating a clay or Lego case for your drive.

Before you begin, you obviously need a USB drive. We suggest one that you don’t mind ruining … you know, just in case. Also, a drive with a small body will likely be easier to use.

Advertisement

For a Lego case, compare the size of the drive with your Lego collection. If none of your Lego bricks are large enough to encase the drive, you have a couple of options. You can cut away the plastic case of your drive or you can make the Legos bigger by gluing more than one piece together. Either way, you’ll have to cut the blocks in half with a razor knife, insert your drive, and then glue it all back together.

Or get even more artistic with clay. Remove the circuit board from your drive and mold oven bake clay around it. You can make just about any shape or size you like. Once you’re happy with the finished product, you simply bake it at a lower temperature in your oven for a few minutes.

3: Upcycled Laptop Bag

The bags that hold your groceries today could be a cool laptop bag tomorrow.
© Santa Rosa Press Democrat

You have a trillion plastic grocery sacks in your house. Their days of hauling bread might be over, but you can put them to use again by making a custom laptop case.

In short, you'll take those bags, melt them together to make thicker layers, and then sew various pieces together to make a sturdy (and eco-friendly) carrying case. If you want, you'll even line the inside with a computer-snuggling liner made of whatever soft fabric you have laying around.

Advertisement

To start this project, gather together a lot of plastic bags, some wax paper and an iron. Trim the handles and bottoms (just the seams) from your bags. Fold a bag twice, which creates an 8-ply layer of plastic. Then squish the bag between two sheets of wax paper and at a medium heat setting, apply the iron to melt the bag into one sheet of plastic.

Repeat this process so that you wind up about 10 to 15 fused pieces of plastic. Then, with a sewing machine, you'll connect each section to another, creating a long blanket of plastic pieces. After you've sewn those pieces together, fold it in half and make sure it's long enough for your laptop. Then sew up the sides. If you want a cushy liner, cut some fabric to fit and secure in within your plastic creation using glue.

2: Concert Hall Earmuffs

"If only I could have warm ears AND my favorite tunes." You can!
© Anna Omelchenko/iStock/Thinkstock

Earbuds are a great for music, but not so great for keeping your ears warm. Combine your earbuds with earmuffs and you'll have cool music on even the coldest days.

Even with novice sewing skills, you can add earbuds to just about any earmuffs. Be advised that with this project, your earbuds won't actually go into your ear canal. Instead, they'll rest behind a layer of fabric, in essence turning your earmuffs into old-school headphones.

Advertisement

Basically, you'll nestle the earbuds into the center of each side of the ear muffs. Then, cut a circle of felt to fit each earpiece. You can use a matching color or go for contrast to score additional fashion points. Rest a felt circle over each earbud and then use thread to sew each circle into place, sealing the earbud so that it can't shift. Then repeat for the other earbud.

You may have to crank up the volume a bit more than normal to hear your tunes, but your ears will stay warm and you'll never worry about misplacing your earbuds again.

Need to keep your whole noggin toasty? Follow the same directions, but stitch your earbuds into a warm winter hat.

1: Smartphone Screen Protector

Protect your smartphone screen from scratches with a little ingenuity.
©Wavebreak Media/Thinkstock

No matter how tough or scratch-resistant a manufacturer might make its smartphone screens, there's still a good chance that yours will collect ugly scratches and scrapes. Model-specific screen covers are often crazy expensive -- $10 or more depending where you look.

Rather than blow cash unnecessarily, make your own screen protectors for almost nothing. Visit your favorite big box store's fabric department or dedicated fabric store and ask for the thinnest clear vinyl they carry. You should be able to procure a whole yard for just a few bucks.

Cut the vinyl to fit and trim out holes for your device's physical buttons. Then just apply the film and use a credit card to push out any air bubbles from under the plastic, and your homemade screen protector is complete. Best of all, you'll have plenty of leftover material for other devices or to replace your protector whenever necessary.

Now that you've seen our 10 favorite projects for getting your nerd on, it's time to get busy. Pick the ones you like best, and the next time you feel like getting geeky, you'll have plenty of ideas to choose from.

Lots More Information

Author's Note: 10 DIY Projects for Nerds

So many gadget-related products these days are born of laziness or lack of creativity. For example, you can buy an endless number of doodads for your smartphone, from car mounts to screen protectors, and wind up spend up hundreds of dollars. Or, you can tap into your own ingenuity, save a slice of your paycheck and have the satisfaction of doing the job yourself.

Related Articles

  • Adventure Cycling Association. "How to Make Your Own Studded Bike Tires." AdventureCycling.org. Feb. 12, 2013. (Jan. 24, 2014) http://www.adventurecycling.org/resources/blog/how-to-make-your-own-studded-bike-tires-a-video/
  • Broida, Rick. "How to Turn a Hardcover Book into an iPad Case." CNET.com. Apr. 16, 2010. (Jan. 24, 2014) http://howto.cnet.com/8301-11310_39-20002710-285/how-to-turn-a-hardcover-book-into-an-ipad-case/
  • Burek, John. "The Best Graphics Card for Gaming: 2013's Top Cards Tested." ComputerShopper.com. Feb. 25,2013. (Jan. 24, 2014) http://www.computershopper.com/feature/the-best-graphics-card-for-gaming-2013-s-top-cards-tested
  • Crigger, Laura. "Gaming Green." 1UP.com. Feb. 2008. (Jan. 24, 2014) http://www.1up.com/features/gaming-green
  • Dachis, Adam. "Make Your Own Screen Protector Quickly and Cheaply with Adhesive Vinyl and an Exacto Knife." LifeHacker.com. Feb. 8, 2012. (Jan. 24, 2014) http://lifehacker.com/5883451/make-your-own-screen-protector-quickly-and-cheaply-with-adhesive-vinyl-and-an-xacto-knife
  • IceBike.org. "Tires for Ice Biking." Feb. 2004. (Jan. 24, 2014) http://www.icebike.org/Equipment/tires.htm
  • Instructables.com. "Create a Custom USB Drive / Figurine out of Polymer Clay." (Jan. 24, 2014) http://www.instructables.com/id/Create-a-custom-USB-drive-figurine/
  • Instructables.com. "Lego USB Stick." (Jan. 24, 2014) http://www.instructables.com/id/Lego-USB-Stick/
  • Instructables.com. "How to Fuse Plastic Bags into a Laptop Case." (Jan. 24, 2014) http://www.instructables.com/id/How-to-Fuse-Plastic-Bags-into-a-Laptop-Case/
  • Instructables.com. "How to Make a Headphones Hat." (Jan. 24, 2014) http://www.instructables.com/id/How-to-make-a-headphones-hat/?ALLSTEPS
  • Instructables.com. "Motherboard PCB Bracelet." (Jan. 24, 2014) http://www.instructables.com/id/Motherboard-PCB-Bracelet/
  • Lloyd, Chris. "Green PC or Powerful Gaming? How to Get Both." TechRadar.com. Aug. 15, 2010. (Jan. 24, 2014) http://www.techradar.com/us/news/computing/pc/green-pc-or-powerful-gaming-how-to-get-both-709456
  • Oye, Emiko. "Circuit Board Boxer Shorts Explode Online." Rewarestyle.com. Feb. 4, 2010. (Jan. 24, 2014) http://blog.rewarestyle.com/tag/circuit-board-jewelry/.
  • Ragan, Sean Michael. "No-Sew Touchscreen Gloves." Makezine.com. (Jan. 24, 2014) http://makezine.com/projects/no-sew-touchscreen-gloves/
  • SolarCooking.org. "Build a Solar Cooker." (Jan. 24, 2014) http://solarcooking.org/plans/
  • Solar Cookers International. "Solar Cooker Basics." (Jan. 24, 2014) http://www.solarcookers.org/
  • Szczys, Mike. "Tablet Cover from Old Hardcover Books." Hackaday.com. Feb. 15, 2012. (Jan. 24, 2014) http://hackaday.com/2012/02/15/tablet-cover-from-old-hardcover-books/
  • Temple, Anjelika. "Baby it's Cold Outside; How to Audio Trick Out Your Earmuffs." Brit.co. Jan. 29, 2012. (Jan. 24, 2014) http://www.brit.co/baby-it-s-cold-outside-how-to-audio-trick-out-your-ear-muffs/
  • Vaknin, Sharon. "How to Hack Your Own Touchscreen Gloves." CNET.com. Dec. 12, 2011. (Jan. 24, 2014) http://howto.cnet.com/8301-11310_39-57340635-285/how-to-hack-your-own-touch-screen-gloves/
  • VanHermert, Kyle. "Zip Tie Snow Tires: The Cheapest Way to Blizzard-Proof Your Bike." LifeHacker.com. Dec. 28, 2010. (Jan. 24, 2014) http://lifehacker.com/5719594/zip-tie-snow-tires-the-cheapest-way-to-blizzard+proof-your-bike
  • Yoneda, Yuka. "Make Your Own "Texting" Gloves for the iPhone or Android (DIY Tutorial)." Ecouterre.com. Dec. 15, 2011. (Jan. 24, 2014) http://www.ecouterre.com/make-your-own-texting-gloves-for-the-iphone-or-android-diy-tutorial/

Advertisement

Loading...